Sagemaker end to end
Sagemaker Components
- Three ways to train models
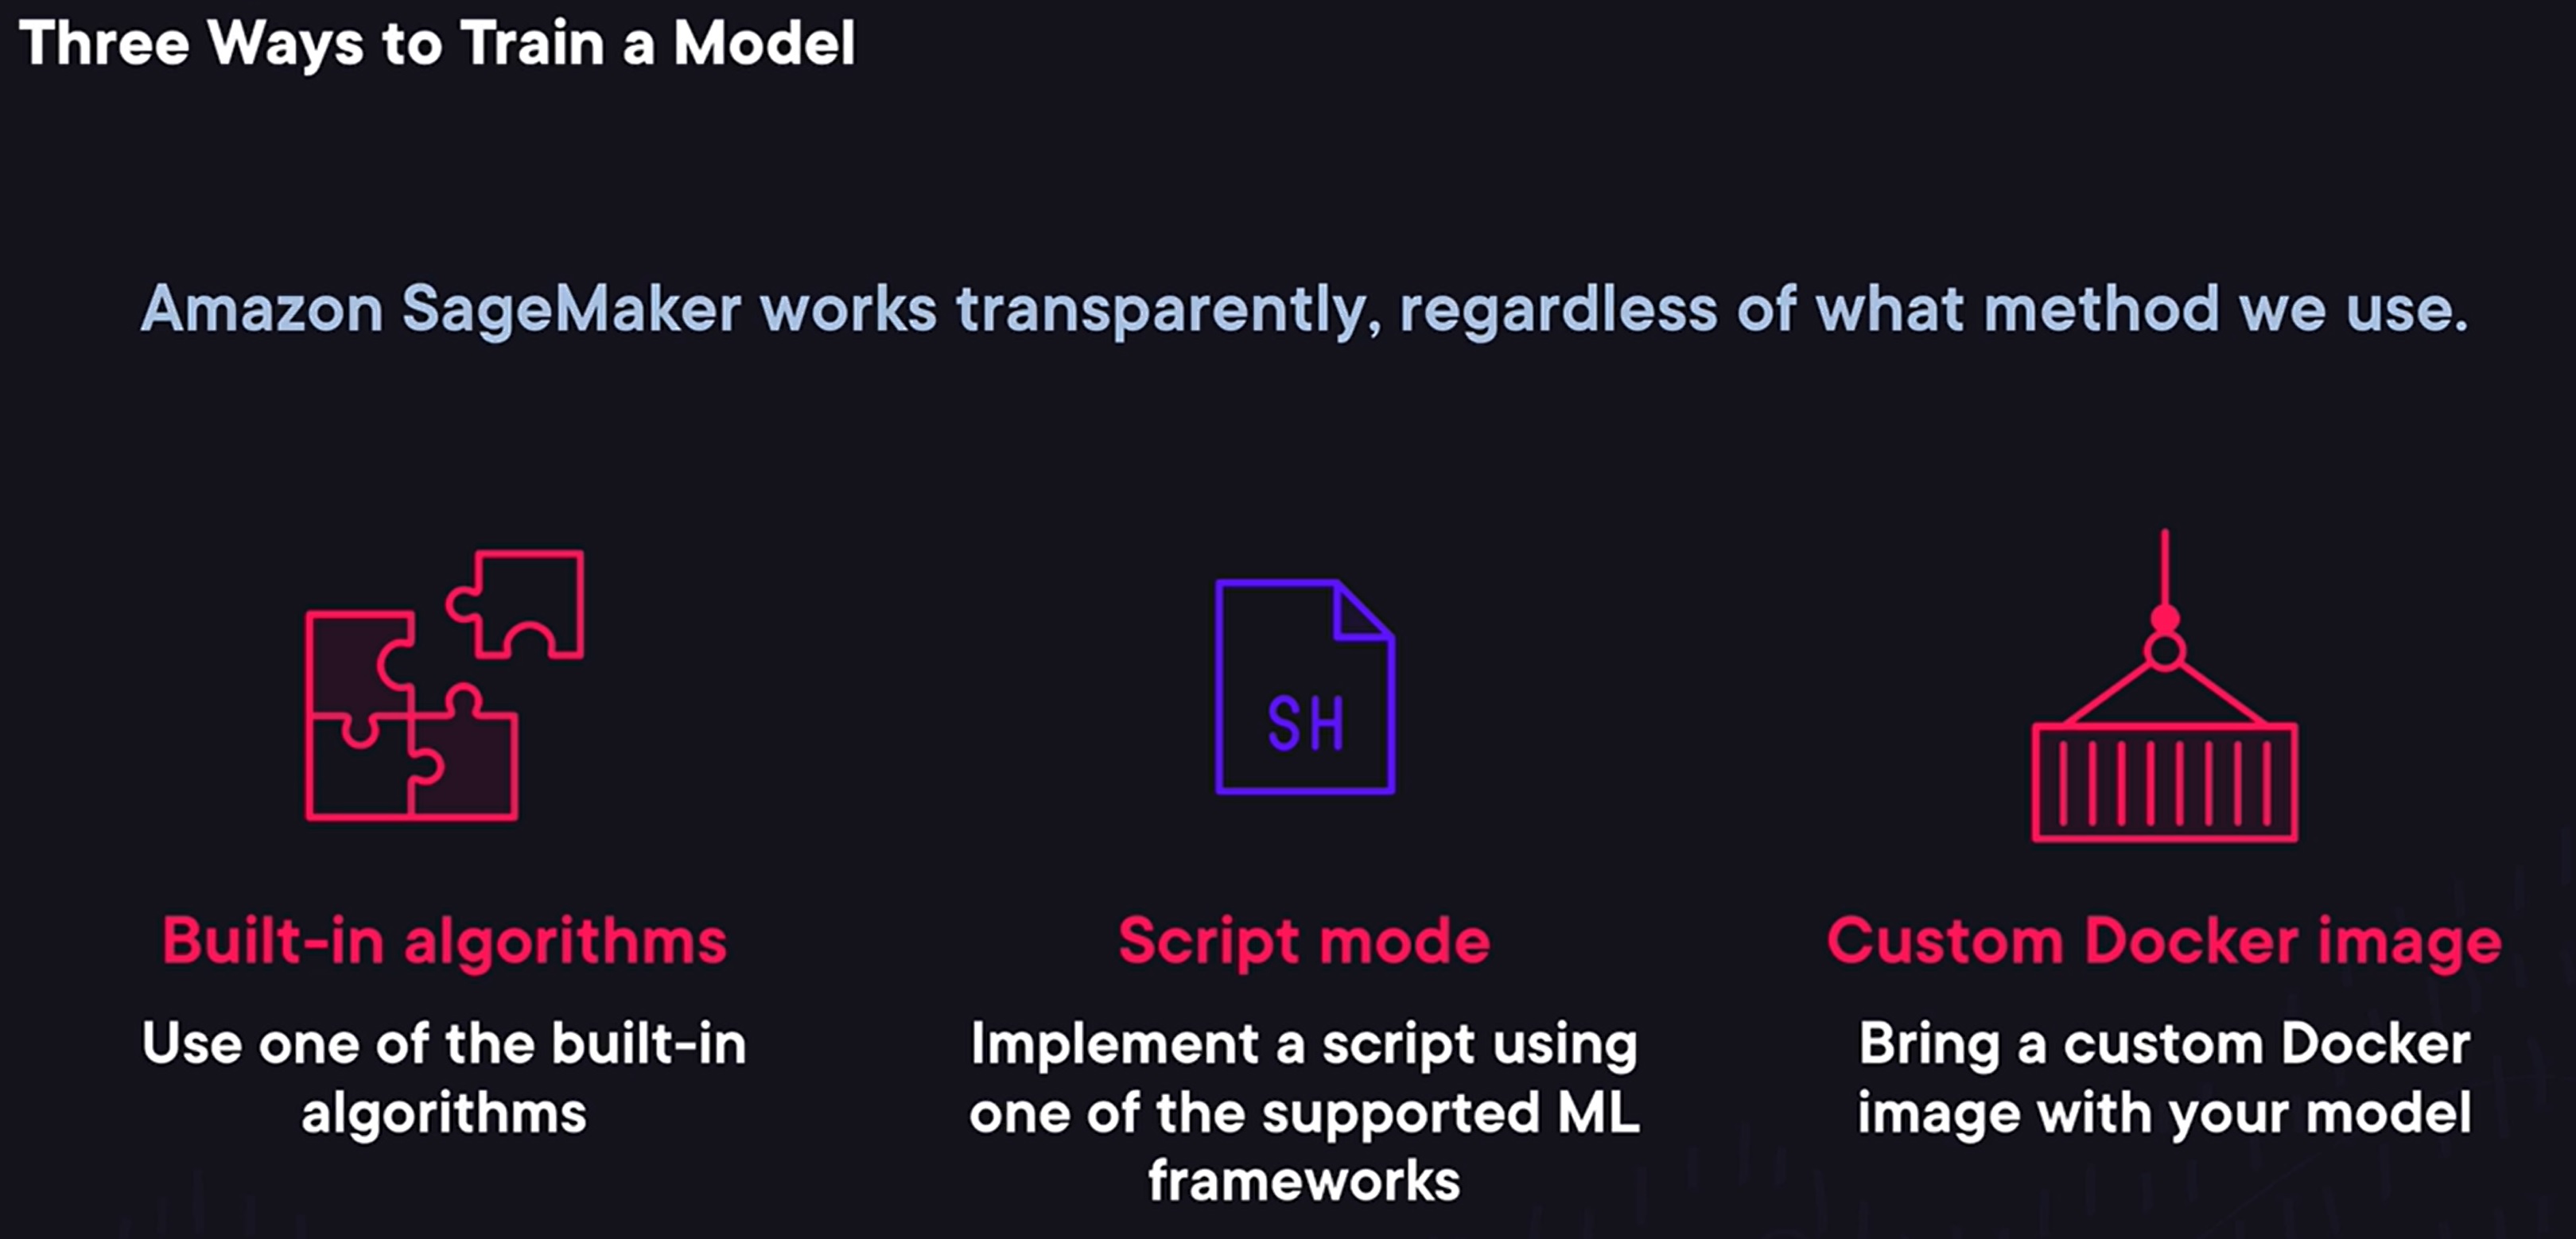
- When it comes to training a machine learning model, SageMaker provides us with three different options with different levels of customizations in the amount of work that they require.
- The easiest option to use one of the builtin algorithms SageMaker provides. It requires very little code to implement but we are limited to algorithms that SageMaker supports out of the box.
- A more flexible option is to use a script mode. In this case, we can implement a Python script that trains the model using one of the supported machine learning frameworks such as the scikit-learn.
- And if this is too restrictive the final option is to create and use a custom docker image that SageMaker will run. And this option allows us to use any language or framework.
- And one thing to note is that SageMaker will work the same with the models we train regardless of what method we use.
Train Models using built in Algo
-
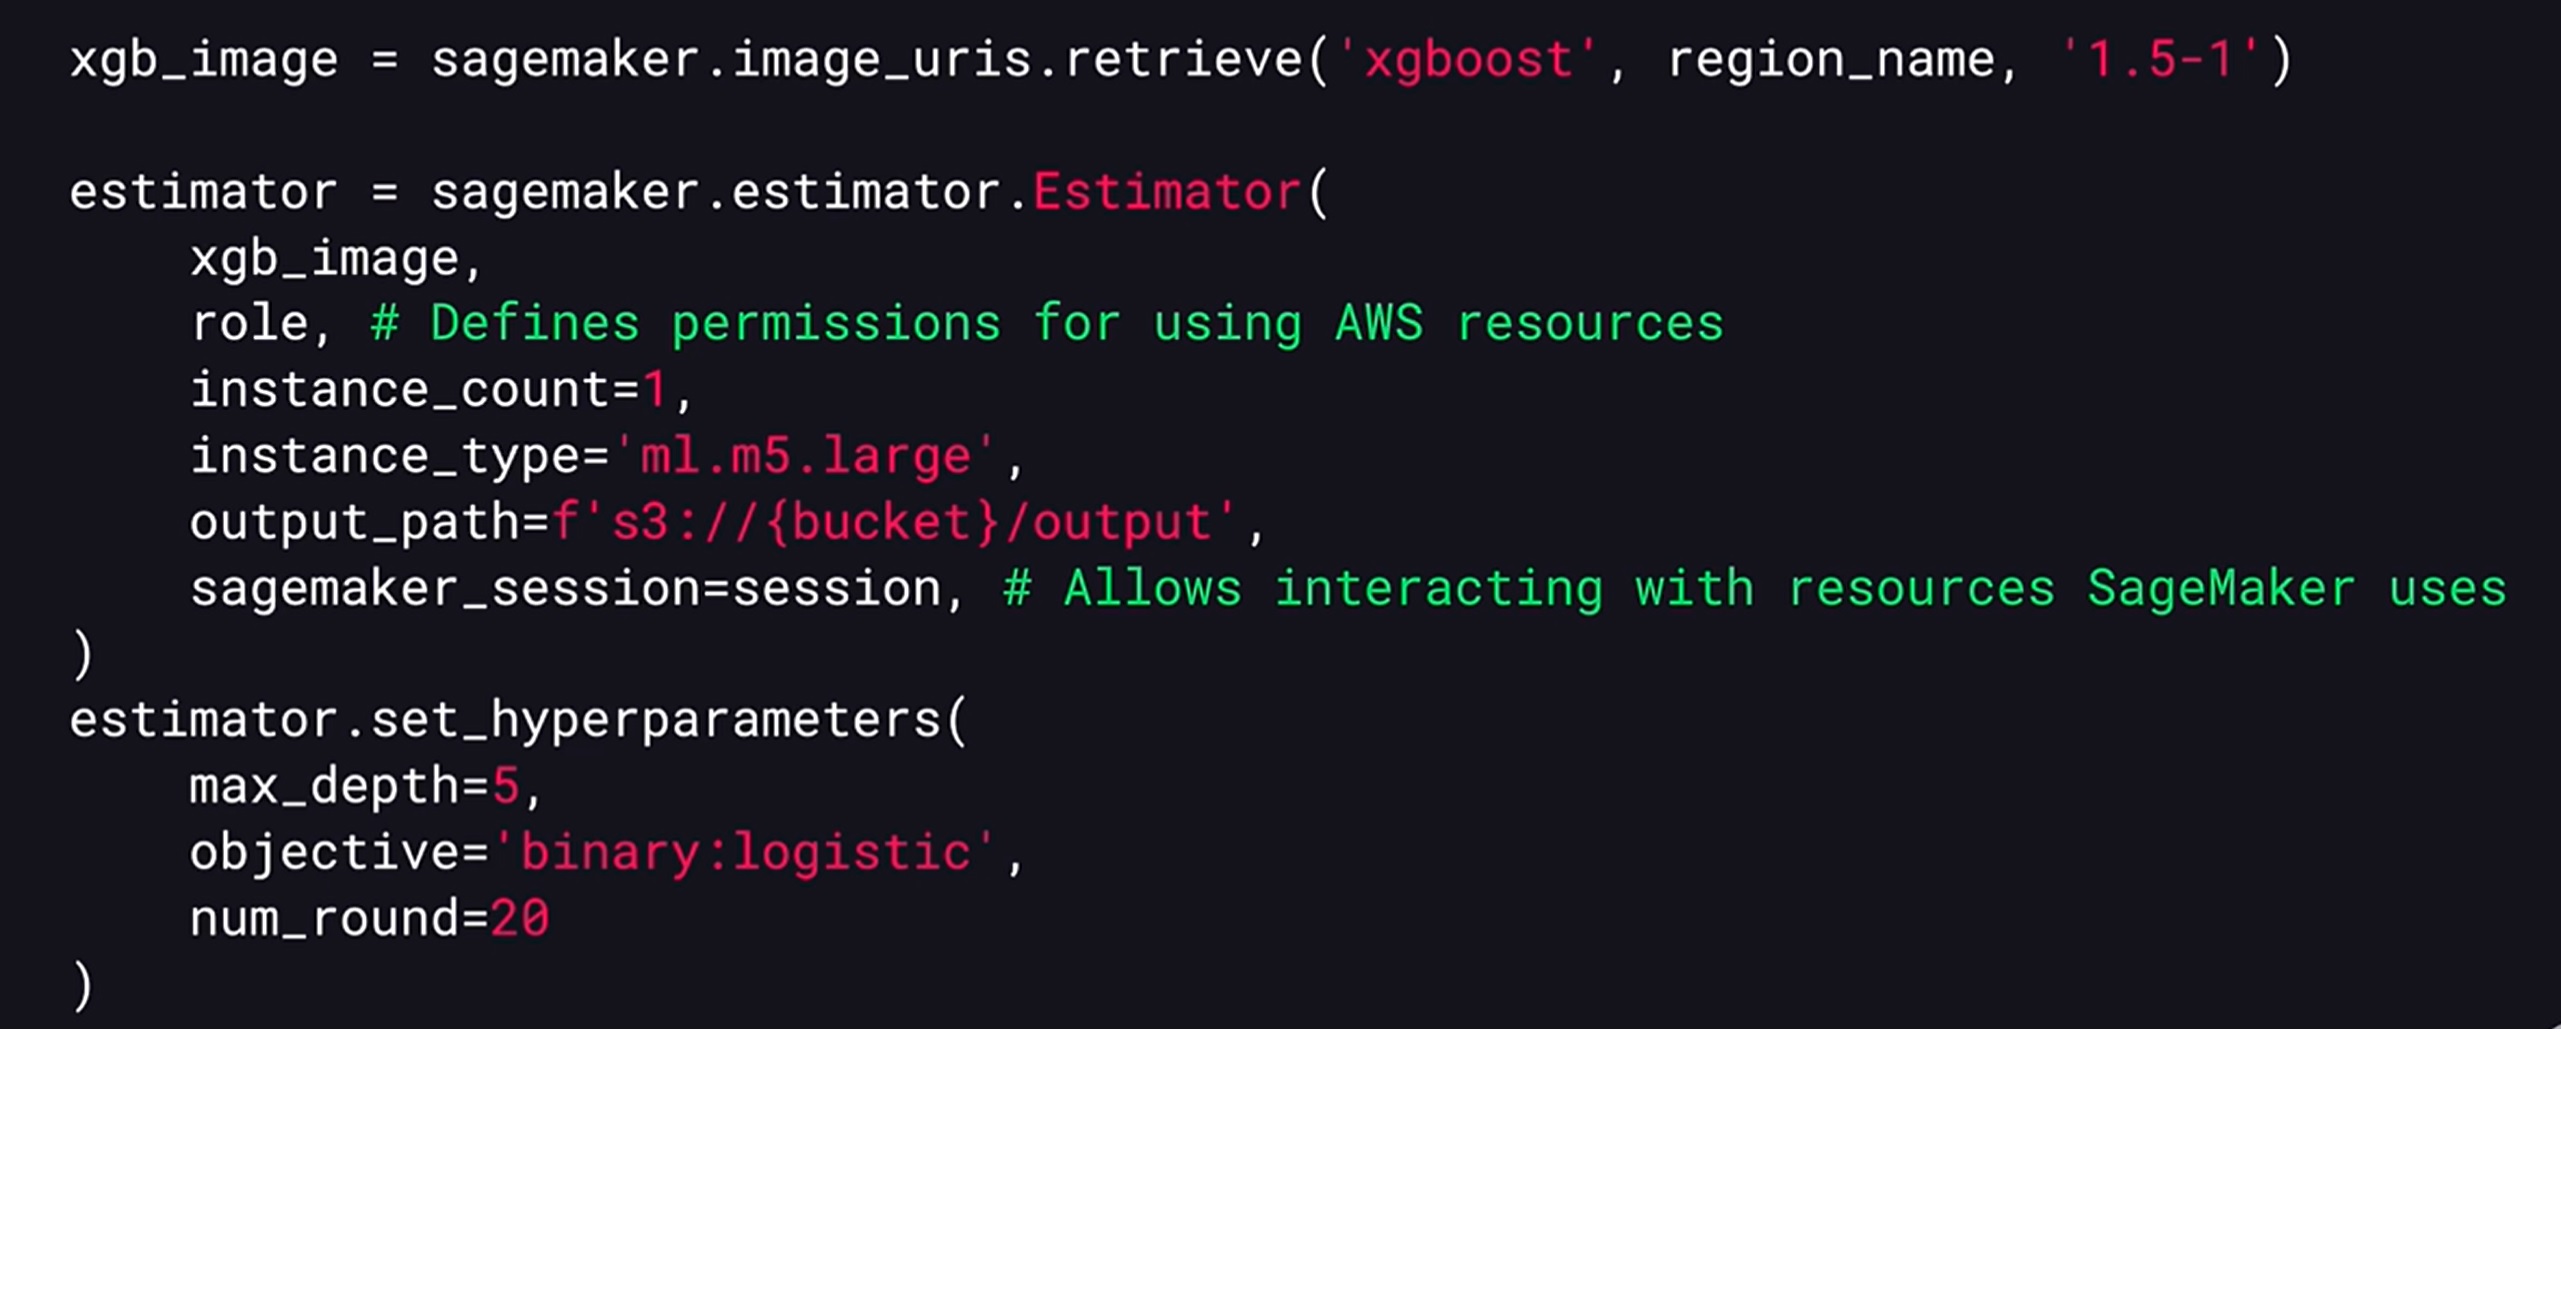
We can train a model using one of the built-in algorithms in SageMaker. To do this, we first need to get a URL of a docker image for one of the built-in algorithms.
-
We can do this using the SageMaker.image_uris.retrieve function, and provide a name of the algorithm we want to use in its version. We then need to create an instance of the estimator type that will be used to train our model.
-
To do this, we need to pass the image URLs that we want to use, an AWS role that defines permissions for AWS resources and then we need to provide a type of instance SageMaker should use for training and a number of instances it’ll run.
-
We also need to provide an output pass where SageMaker will write a train model. The final parameter we need to provide is SageMaker session instance. This object allows to interact with various resources that SageMaker uses.
-
We can also optionally set hyper parameters that configure the training process and the structure of the trained model.
-
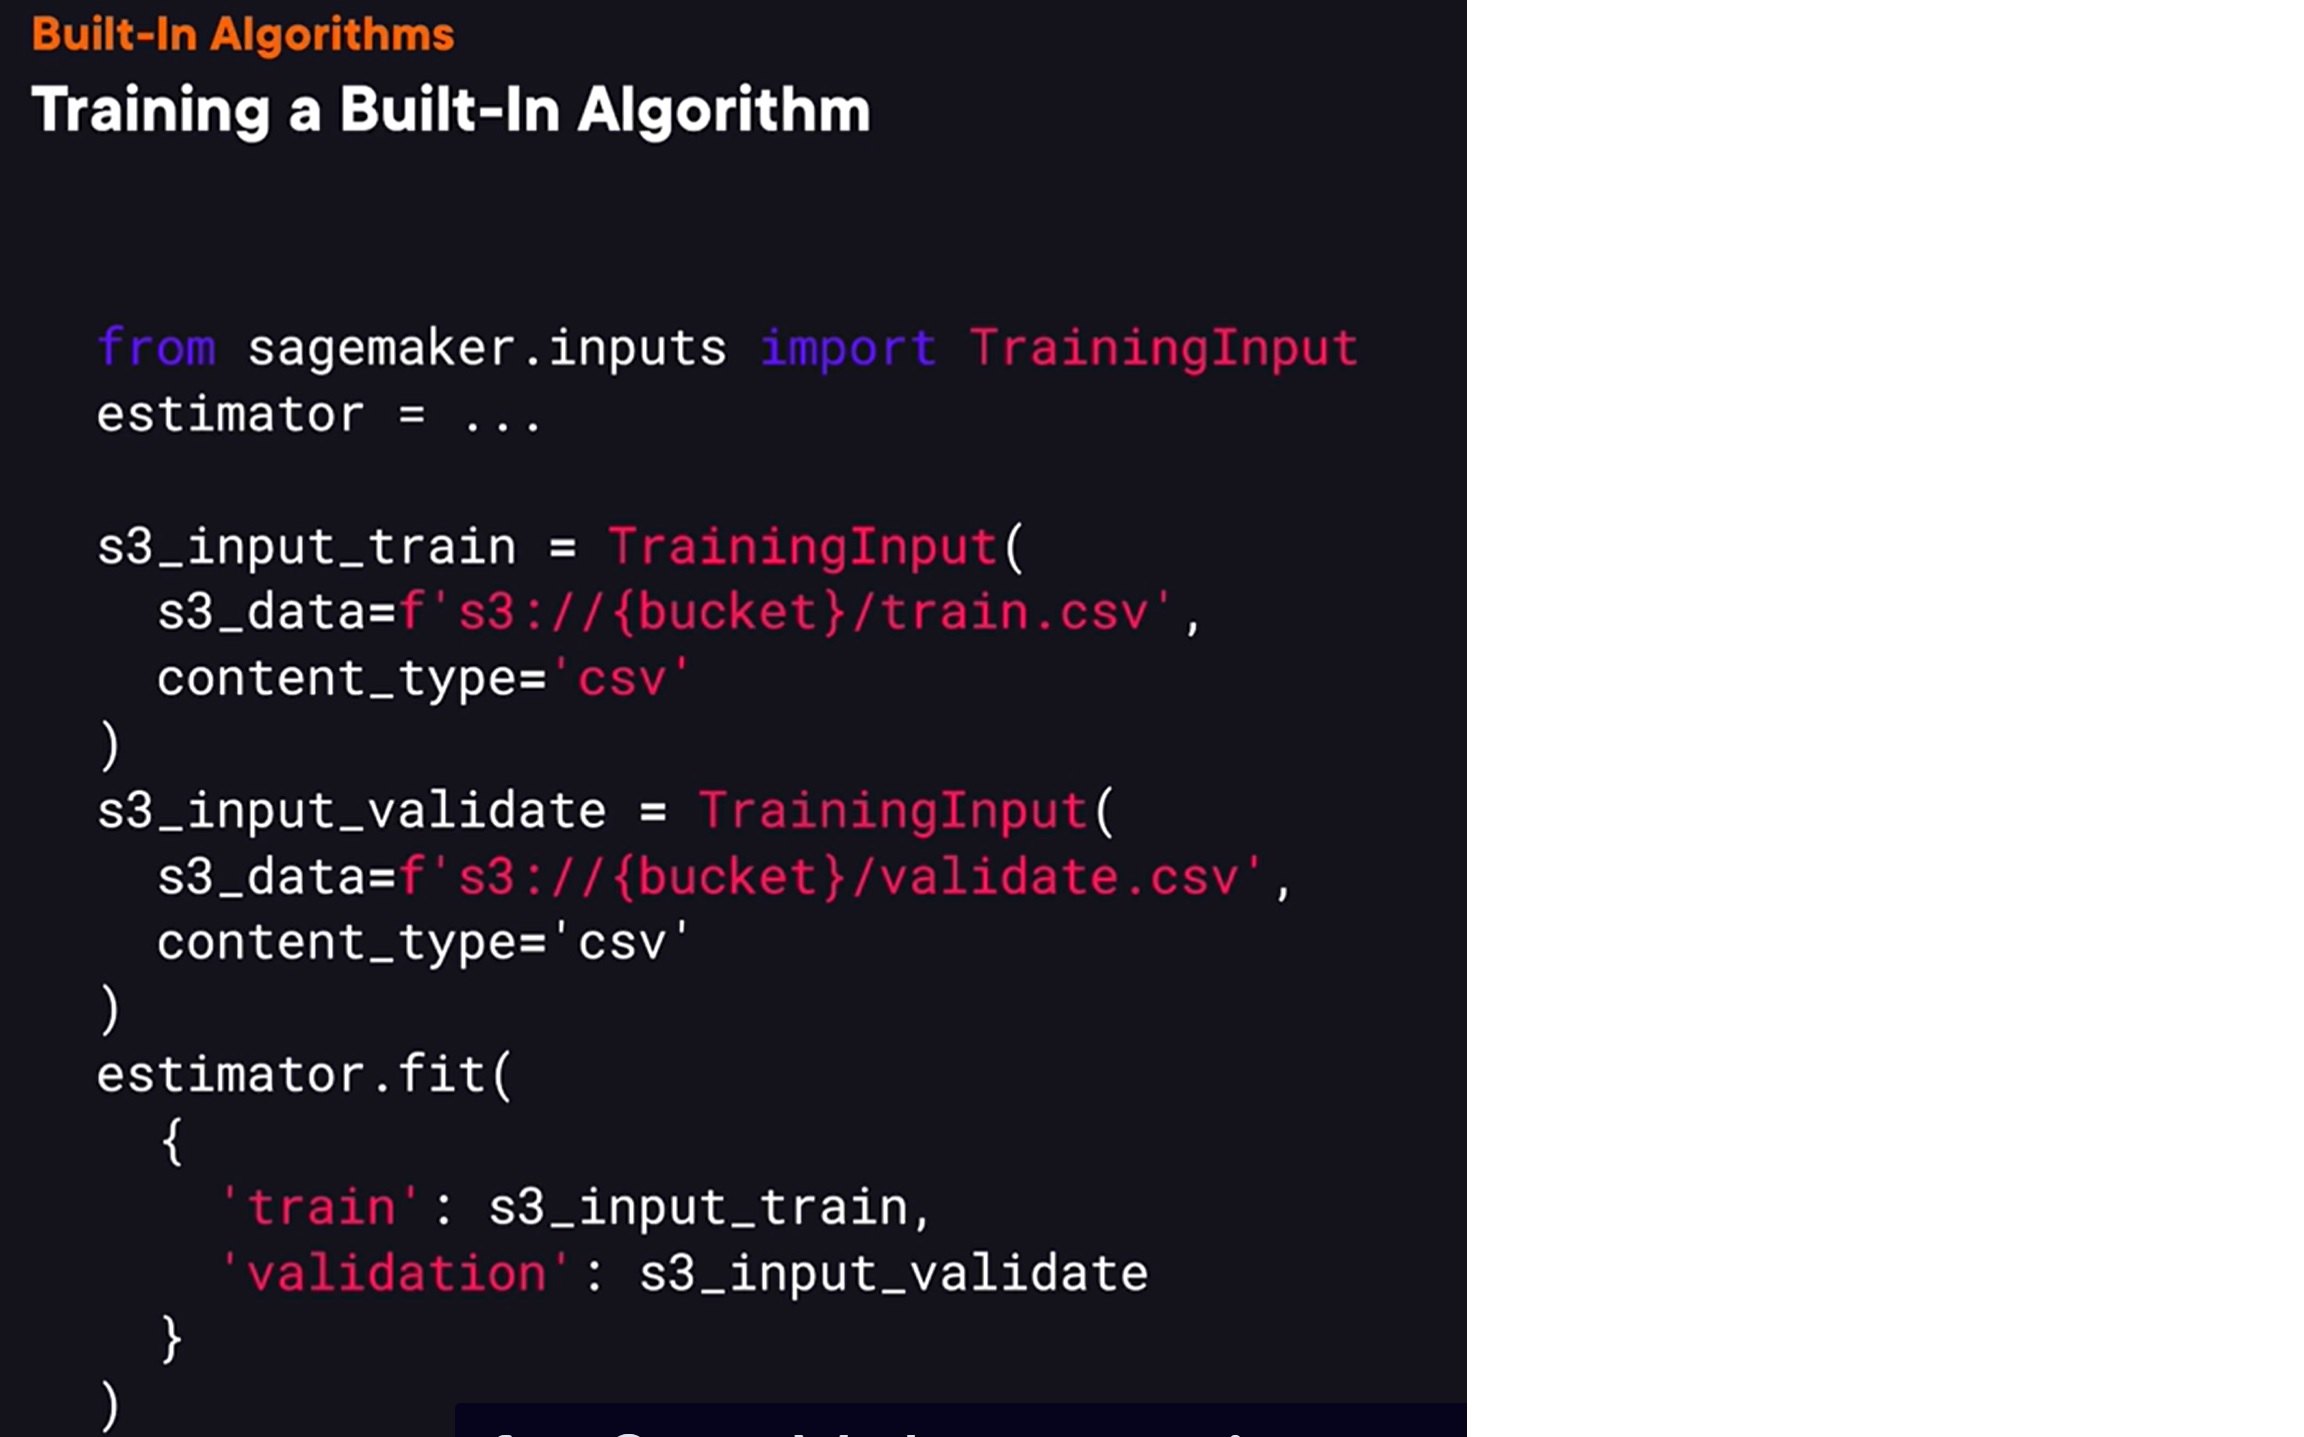
To train the model,
we also need to provide what data to use for model training. To provide it, we need to create an instance of training input, and we need to provide a pass to a data set in S3 and a data format this data set is stored in. Once we have training inputs for both training data and a validation data set, we can call an estimator fit method that will actually train the model and here we pass both training input instances for SageMaker to train a model using this data.
Deploy models using Sagemaker
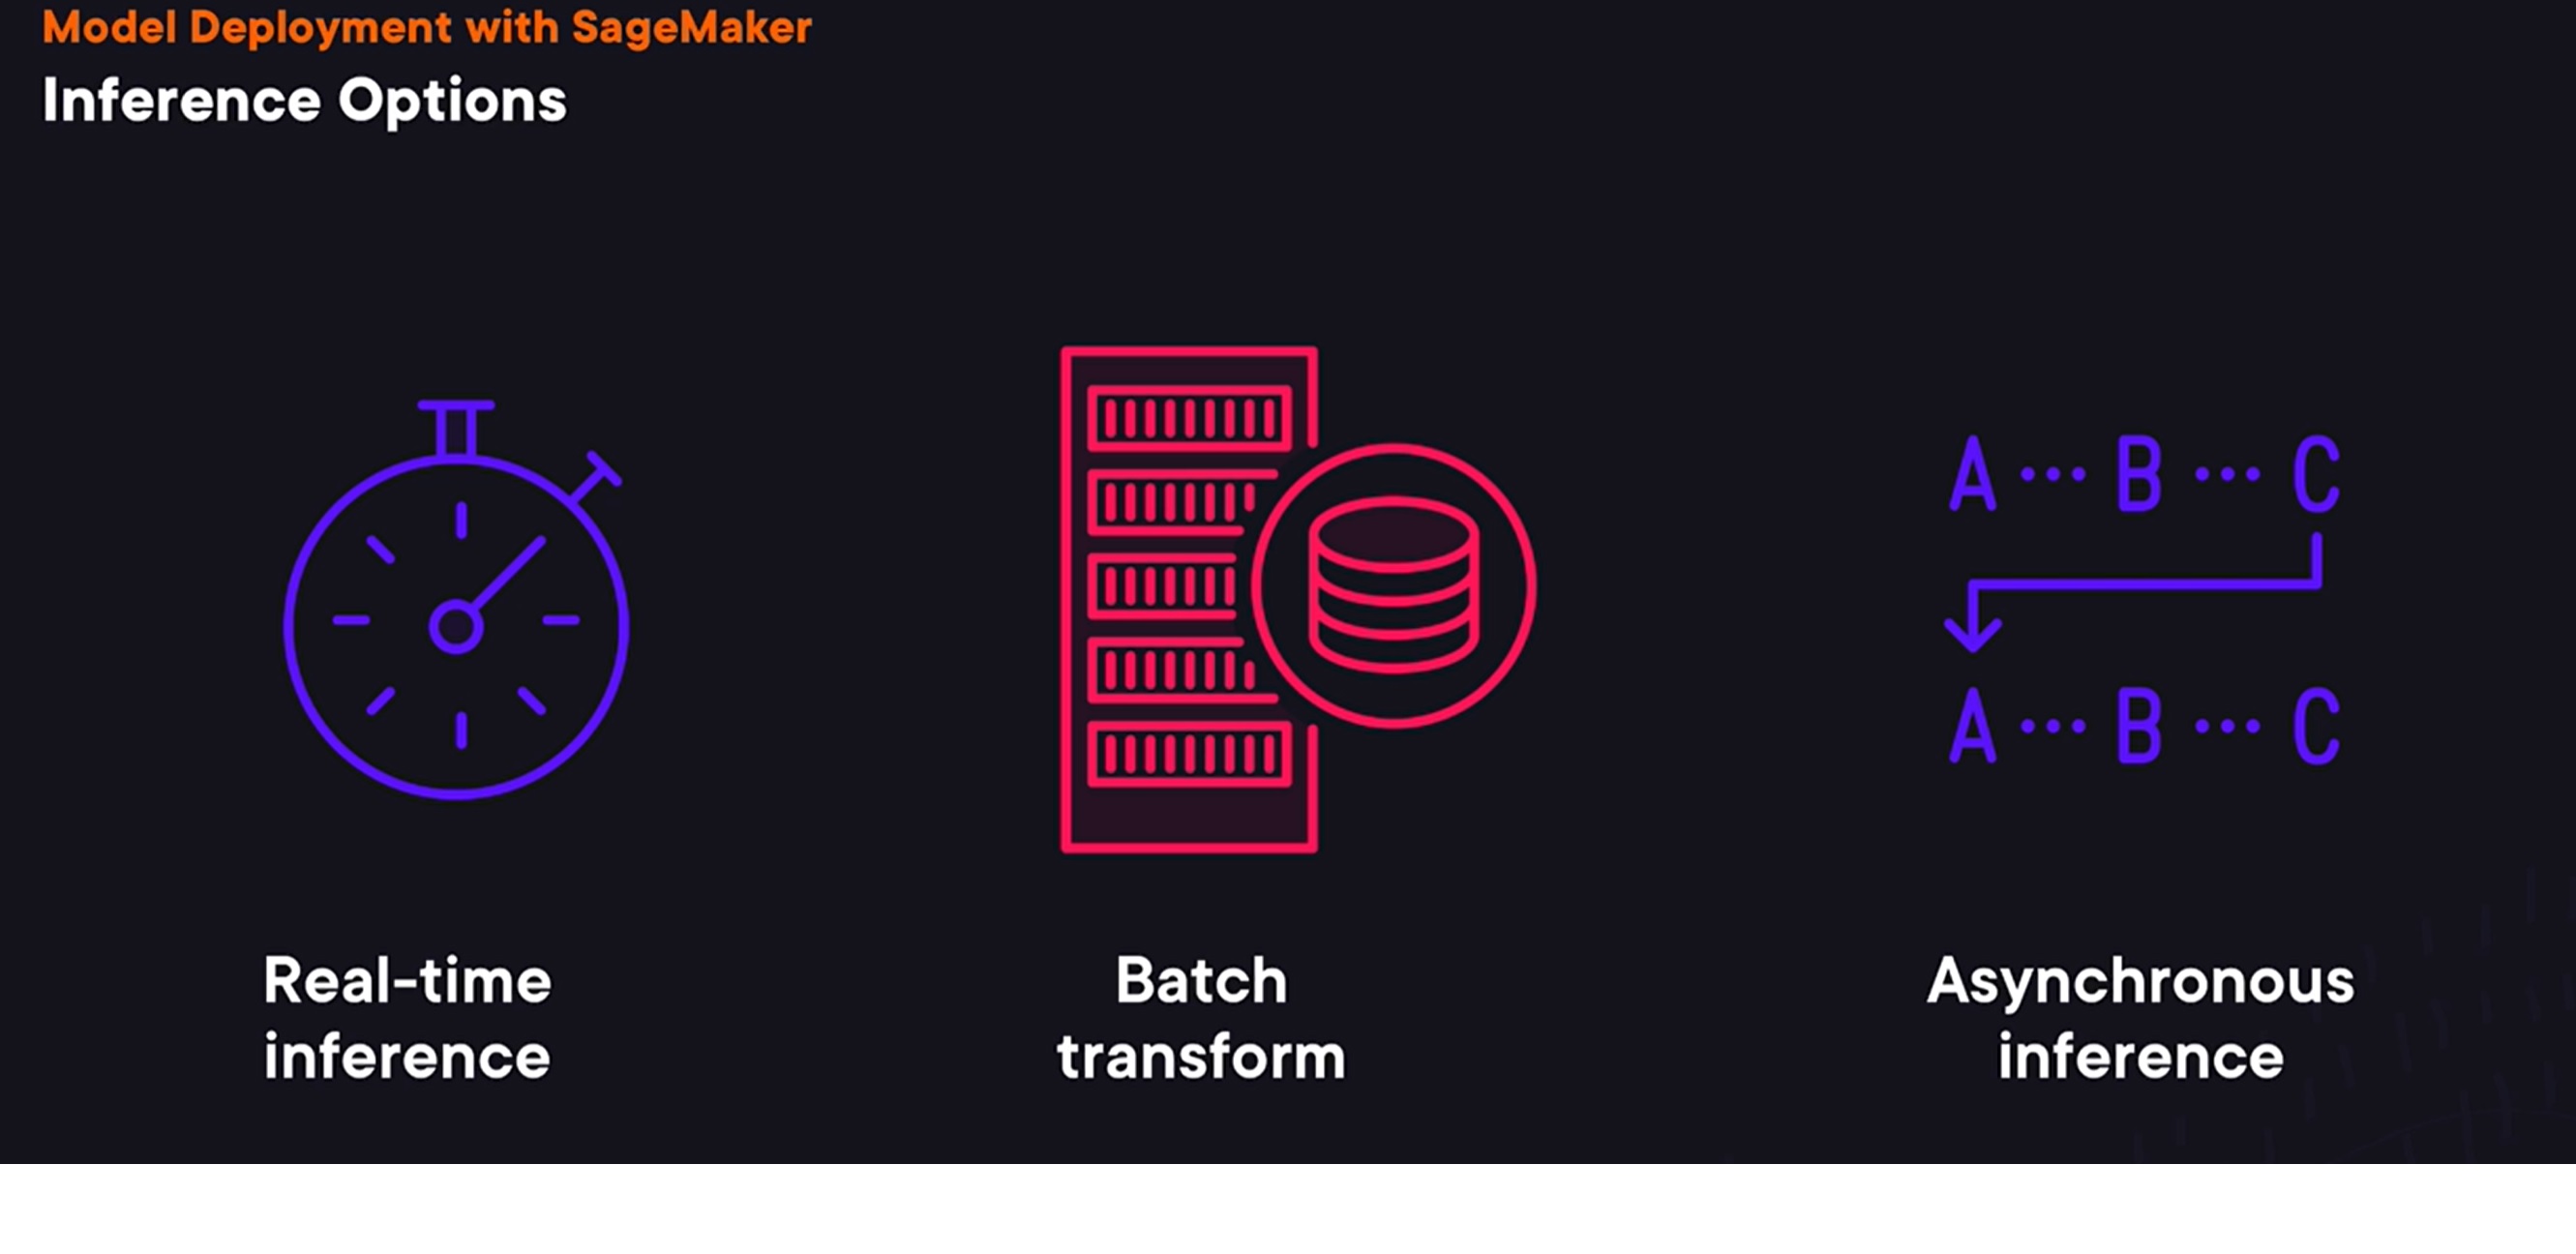
- SageMaker provides three options
for performing model inference. One option is to use a real-time inference. In this case, SageMaker will create an HTTP endpoint that can be used to send a request to a trained model. The benefit of this option is that it allows to get inference results in real time, but in this case, SageMaker sets low limits for maximum payload size and requests timeout. If we need to perform inference on a large dataset and don’t need real-time responses, then, we can use batch transform option. In this case, SageMaker can perform inference on each element of a dataset in S3. Or alternatively, we can use asynchronous inference. In this case, we can place a request on a queue and receive a response asynchronously via SNS. This option has higher limits for the request size and a timeout.
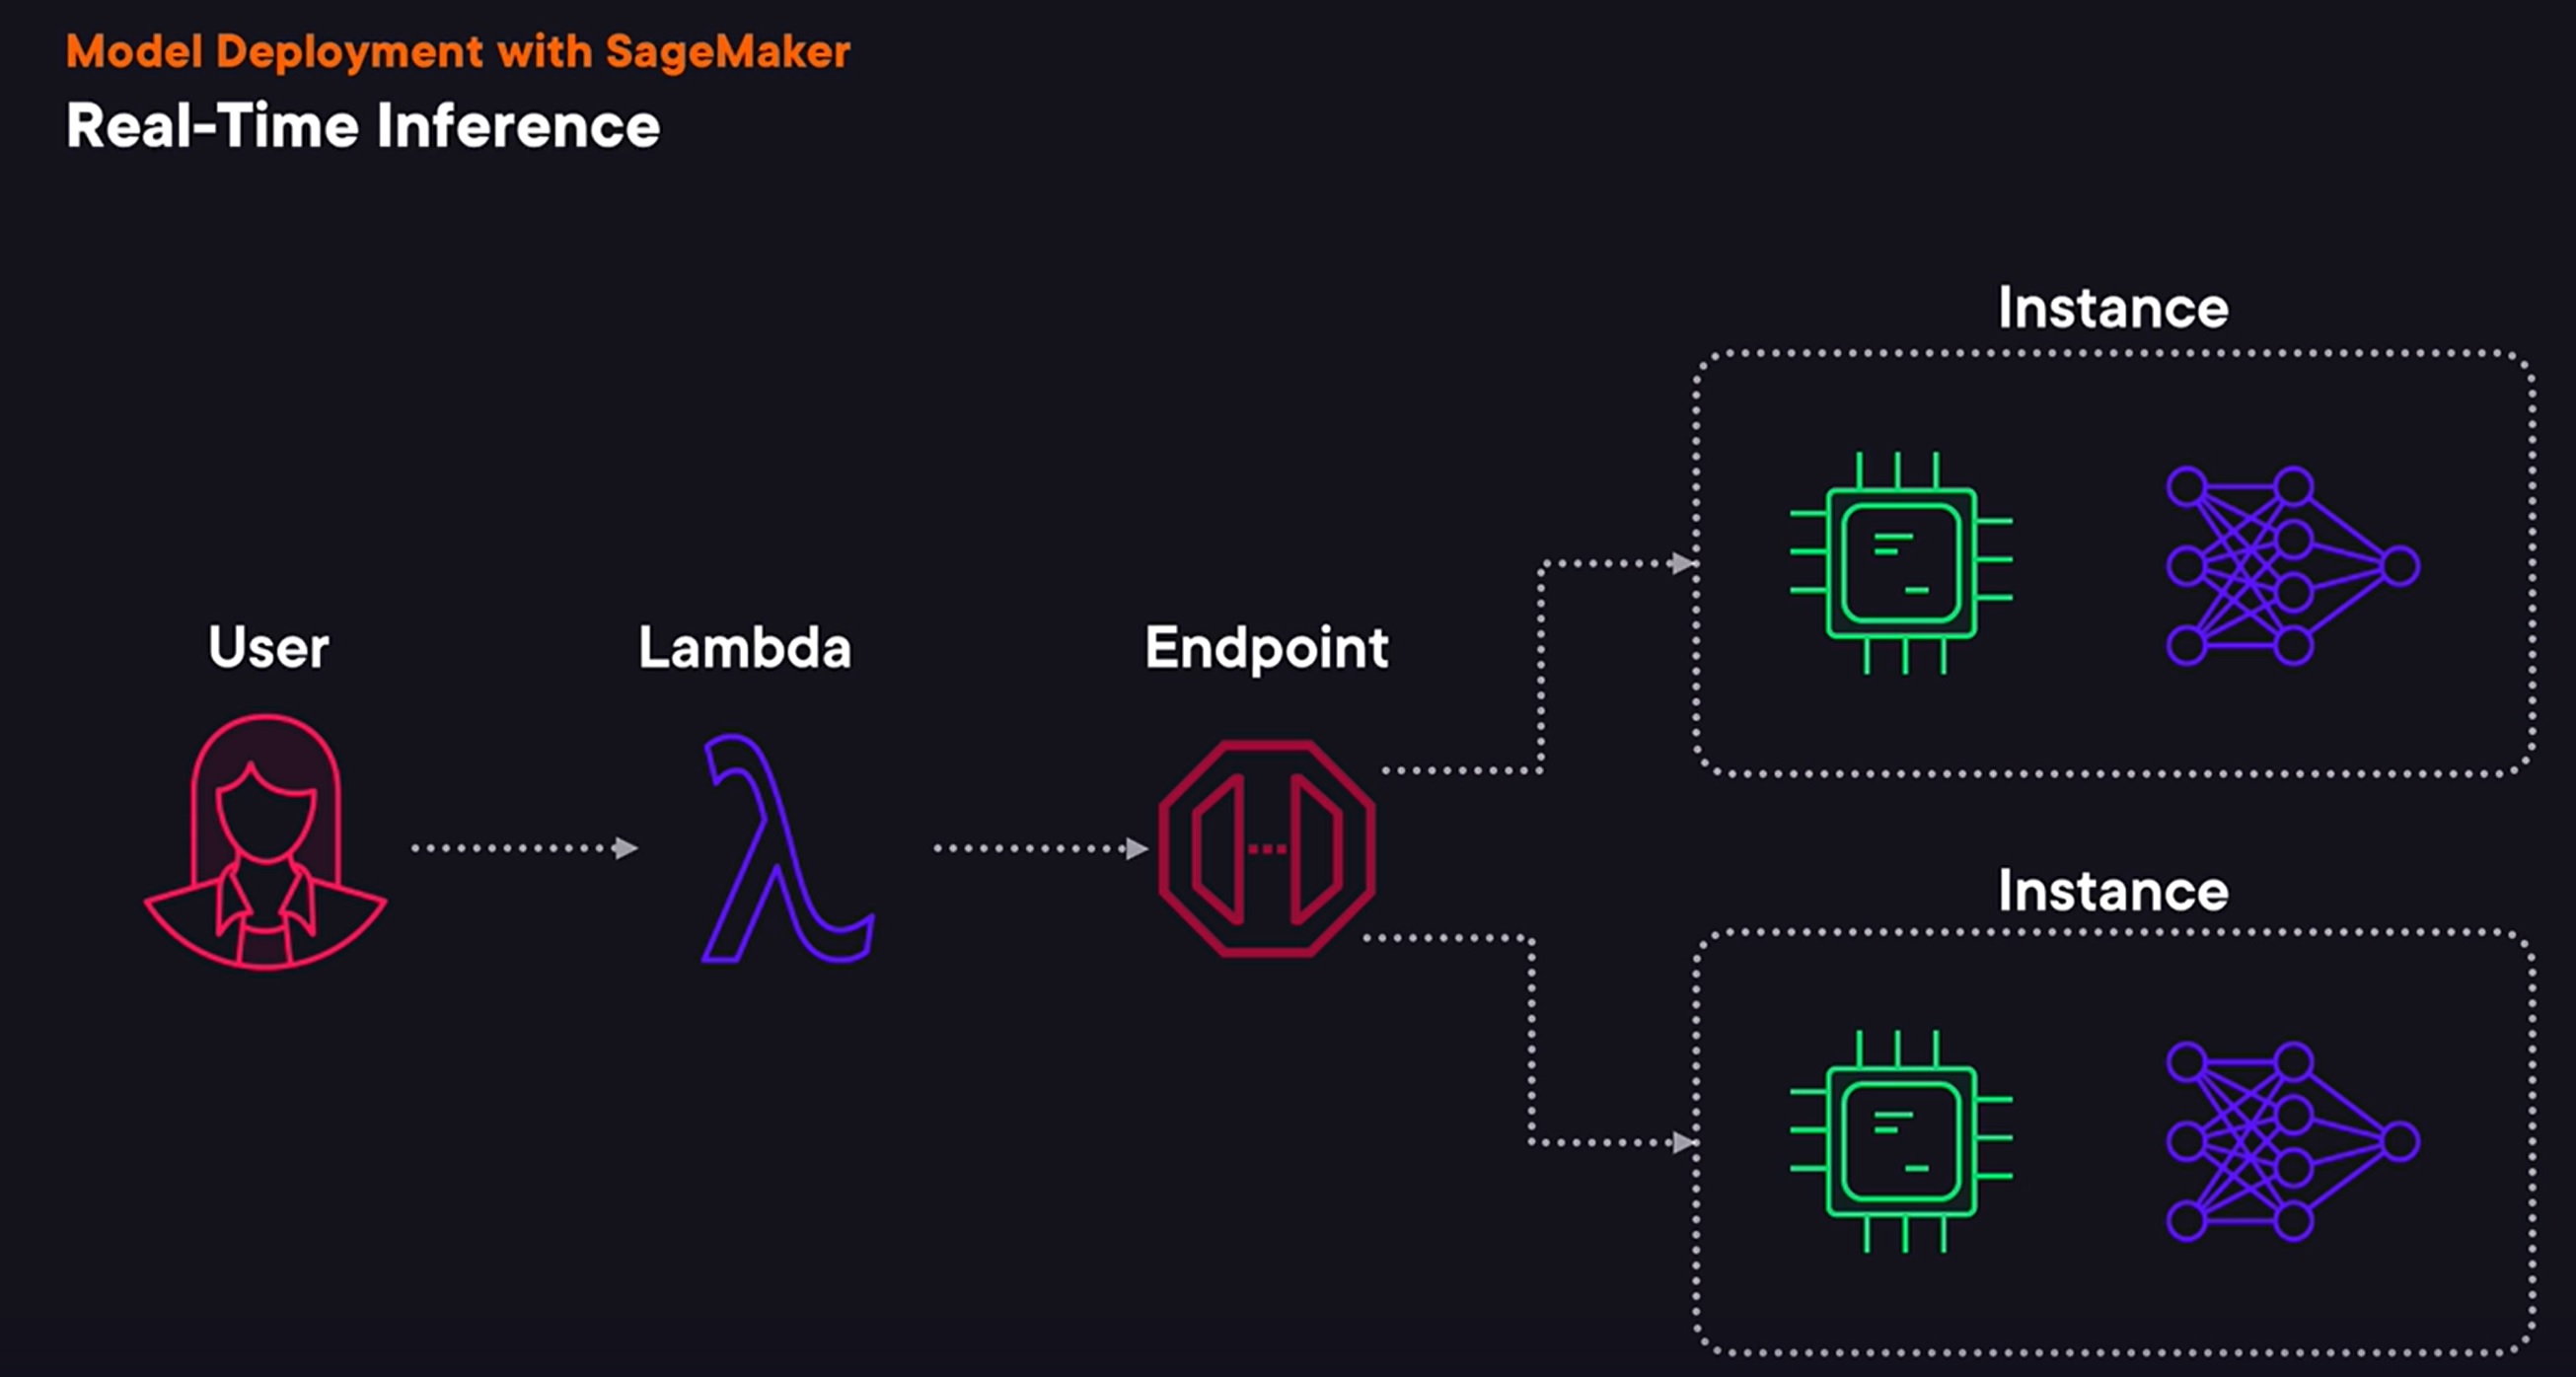
- The main benefit of using this option
is that it allows us to perform inference with a sub-second latency. It also supports autoscaling, so if the number of requests increases, AWS can automatically deploy more hosts, performing inference using our model, and it can also reduce the number of hosts if demand decreases. As with other options, we can deploy any model for real-time inference. We can use a model trained using a built-in algorithm or we can use a model trained with a custom algorithm, say trained using a custom Docker image. Real-time inference has a few important downsides. First, we can only send a payload for inference if it is up to six megabytes in size, and SageMaker sets a limit for a response timeout to 60 seconds. When we deploy a trained model for real-time inference, SageMaker will provision one or multiple instances and upload our trained model on these instances. It will also create an HTTP endpoint we can use to send requests to perform inference. While we can invoke SageMaker endpoint using HTTP API directly, we can also add another endpoint or service, calling SageMaker endpoint from it. It could, for example, implement additional data pre-processing before sending a request to our model.
Advanced Model deployments in sagemaker
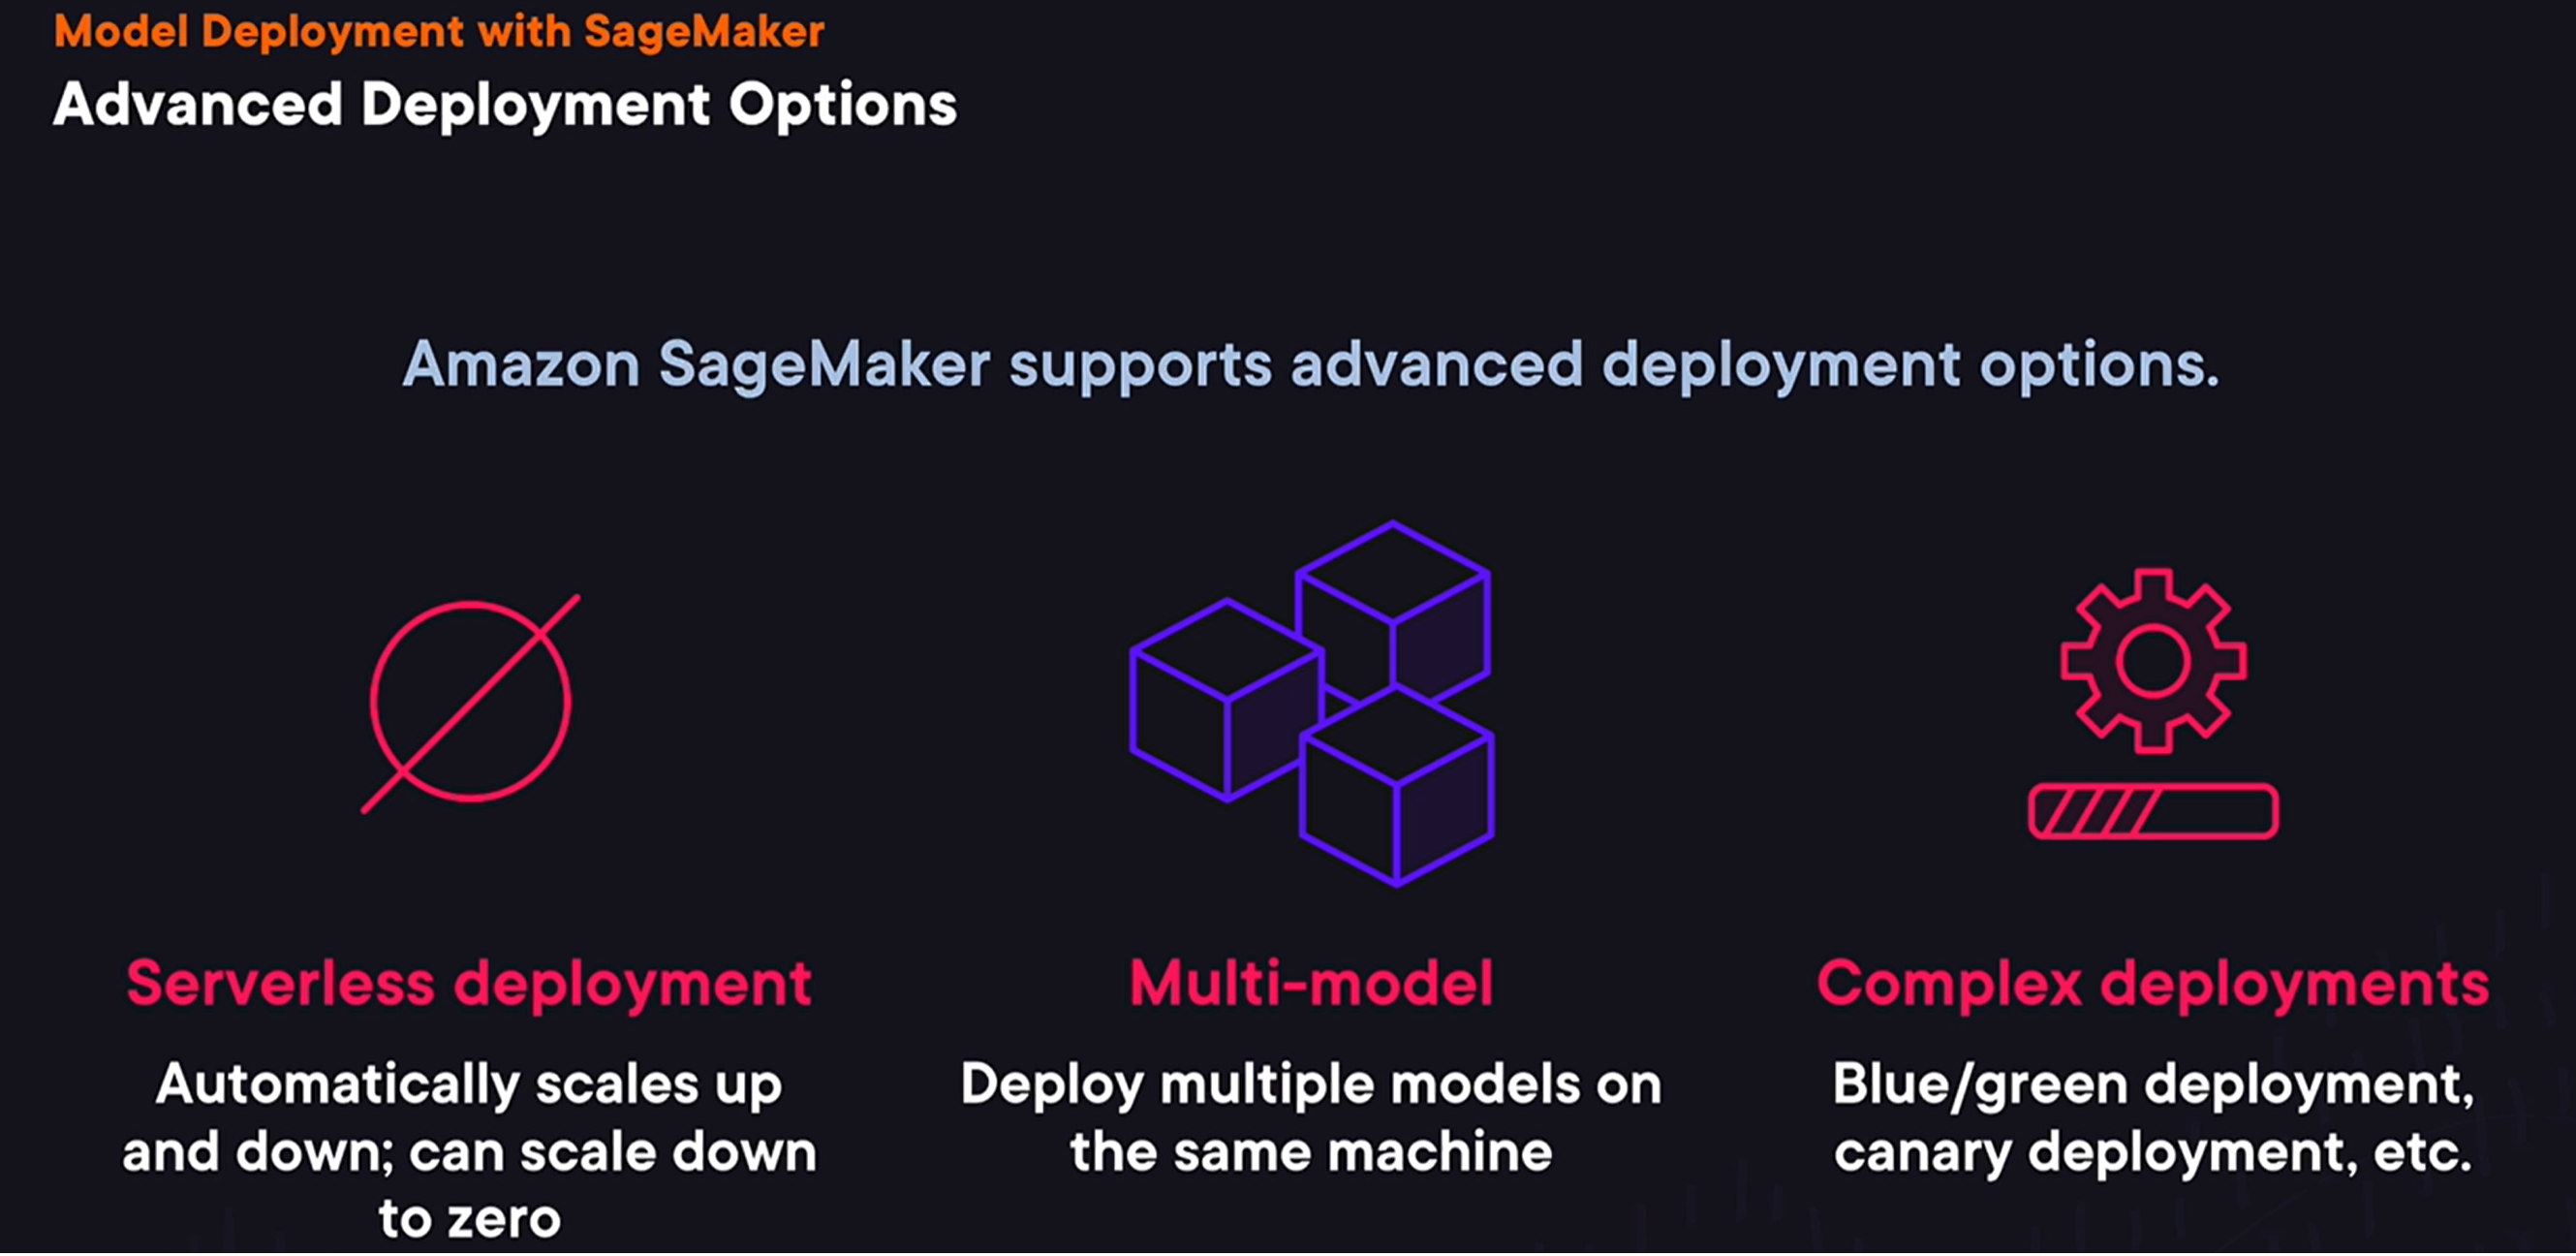
- SageMaker also supports advanced deployment options
for real-time deployments. One option is to use serverless deployments. It allows us to run endpoints without managing the servers directly, and AWS will scale them up or down for us, but it will also allow us to scale a deployment down to zero in case if we have periods without any inference requests. Another option is to use multi-model deployment, when we can deploy multiple models on the same instance. So, instead of provisioning multiple hosts for every single model we have, even if there’re not used frequently, we can have multiple models deployed on the same hardware, saving us some money. And one more option that we’ll cover a bit later are complex deployments. For example, we can use canary deployments, when instead of redirecting all traffic to a new model at once, we can do it gradually, monitoring a deployment and reverting a deployment process if something goes wrong.
Batch Transform
- using
the batch transform wizard trained model. As we’ve discussed before, it allows us to perform inference on each element of a large dataset. We can either run it once or perform it periodically, if, for example, we get a new version of a dataset. Comparing to the real-time inference option, in this case, SageMaker does not create an endpoint. Instead, it reads input data from S3 and writes inference results back to S3. Let’s look at how we can use batch transform. Once we have a trained model, we can call the transformer method to create a transformer instance that we can then use to perform batch transformation on a large dataset. To create it, we need to provide a number of instances we want to use to perform a transform job, a type of instances we want to use, and an output path where SageMaker will write the result of the transformation. Once we have a transformer instance, we can call the transform method to perform model inference. To do this, we need to pass S3 pass of an input dataset, on which SageMaker should perform batch transformation.
Asynchronous Inference
- In this case, instead of sending a request to an endpoint,
a request is placed on the queue, and model then receives this request from a queue and sends a response back asynchronously by sending it via the SNS service. We’re gonna use this option when our use case does not fit the limits set by SageMaker for real-time inference. With asynchronous inference, we can send requests with size up to one gigabyte, and the model can take up to one hour of processing time.
- The main benefits of this option
is that it has higher limits for the request size and timeouts.
Code for Model Deployment
  # Serialize if needed
from sagemaker.serializers import CSVSerializer

xgb_predictor = xgb.deploy(
    initial_instance_count=1,
    instance_type='ml.t2.medium',
    serializer=CSVSerializer()
)
 # To use the deployed model on test or new dataset
 res = xgb_predictor.predict(attributes[0]).decode('utf-8')  # To predict one observation
 results = xgb_predictor.predict(attributes).decode('utf-8') # To infer multiple observations
 predictions_str = results.split('\n')[:-1]
 predictions = [float(res_str) for res_str in predictions_str]
 from sklearn.metrics import accuracy_score
 accuracy_score(actual, np.round(predictions))

 # To delete the endpoint
 xgb_predictor.delete_endpoint()
Sagemaker Pipelines
What is Sagemaker Pipelines
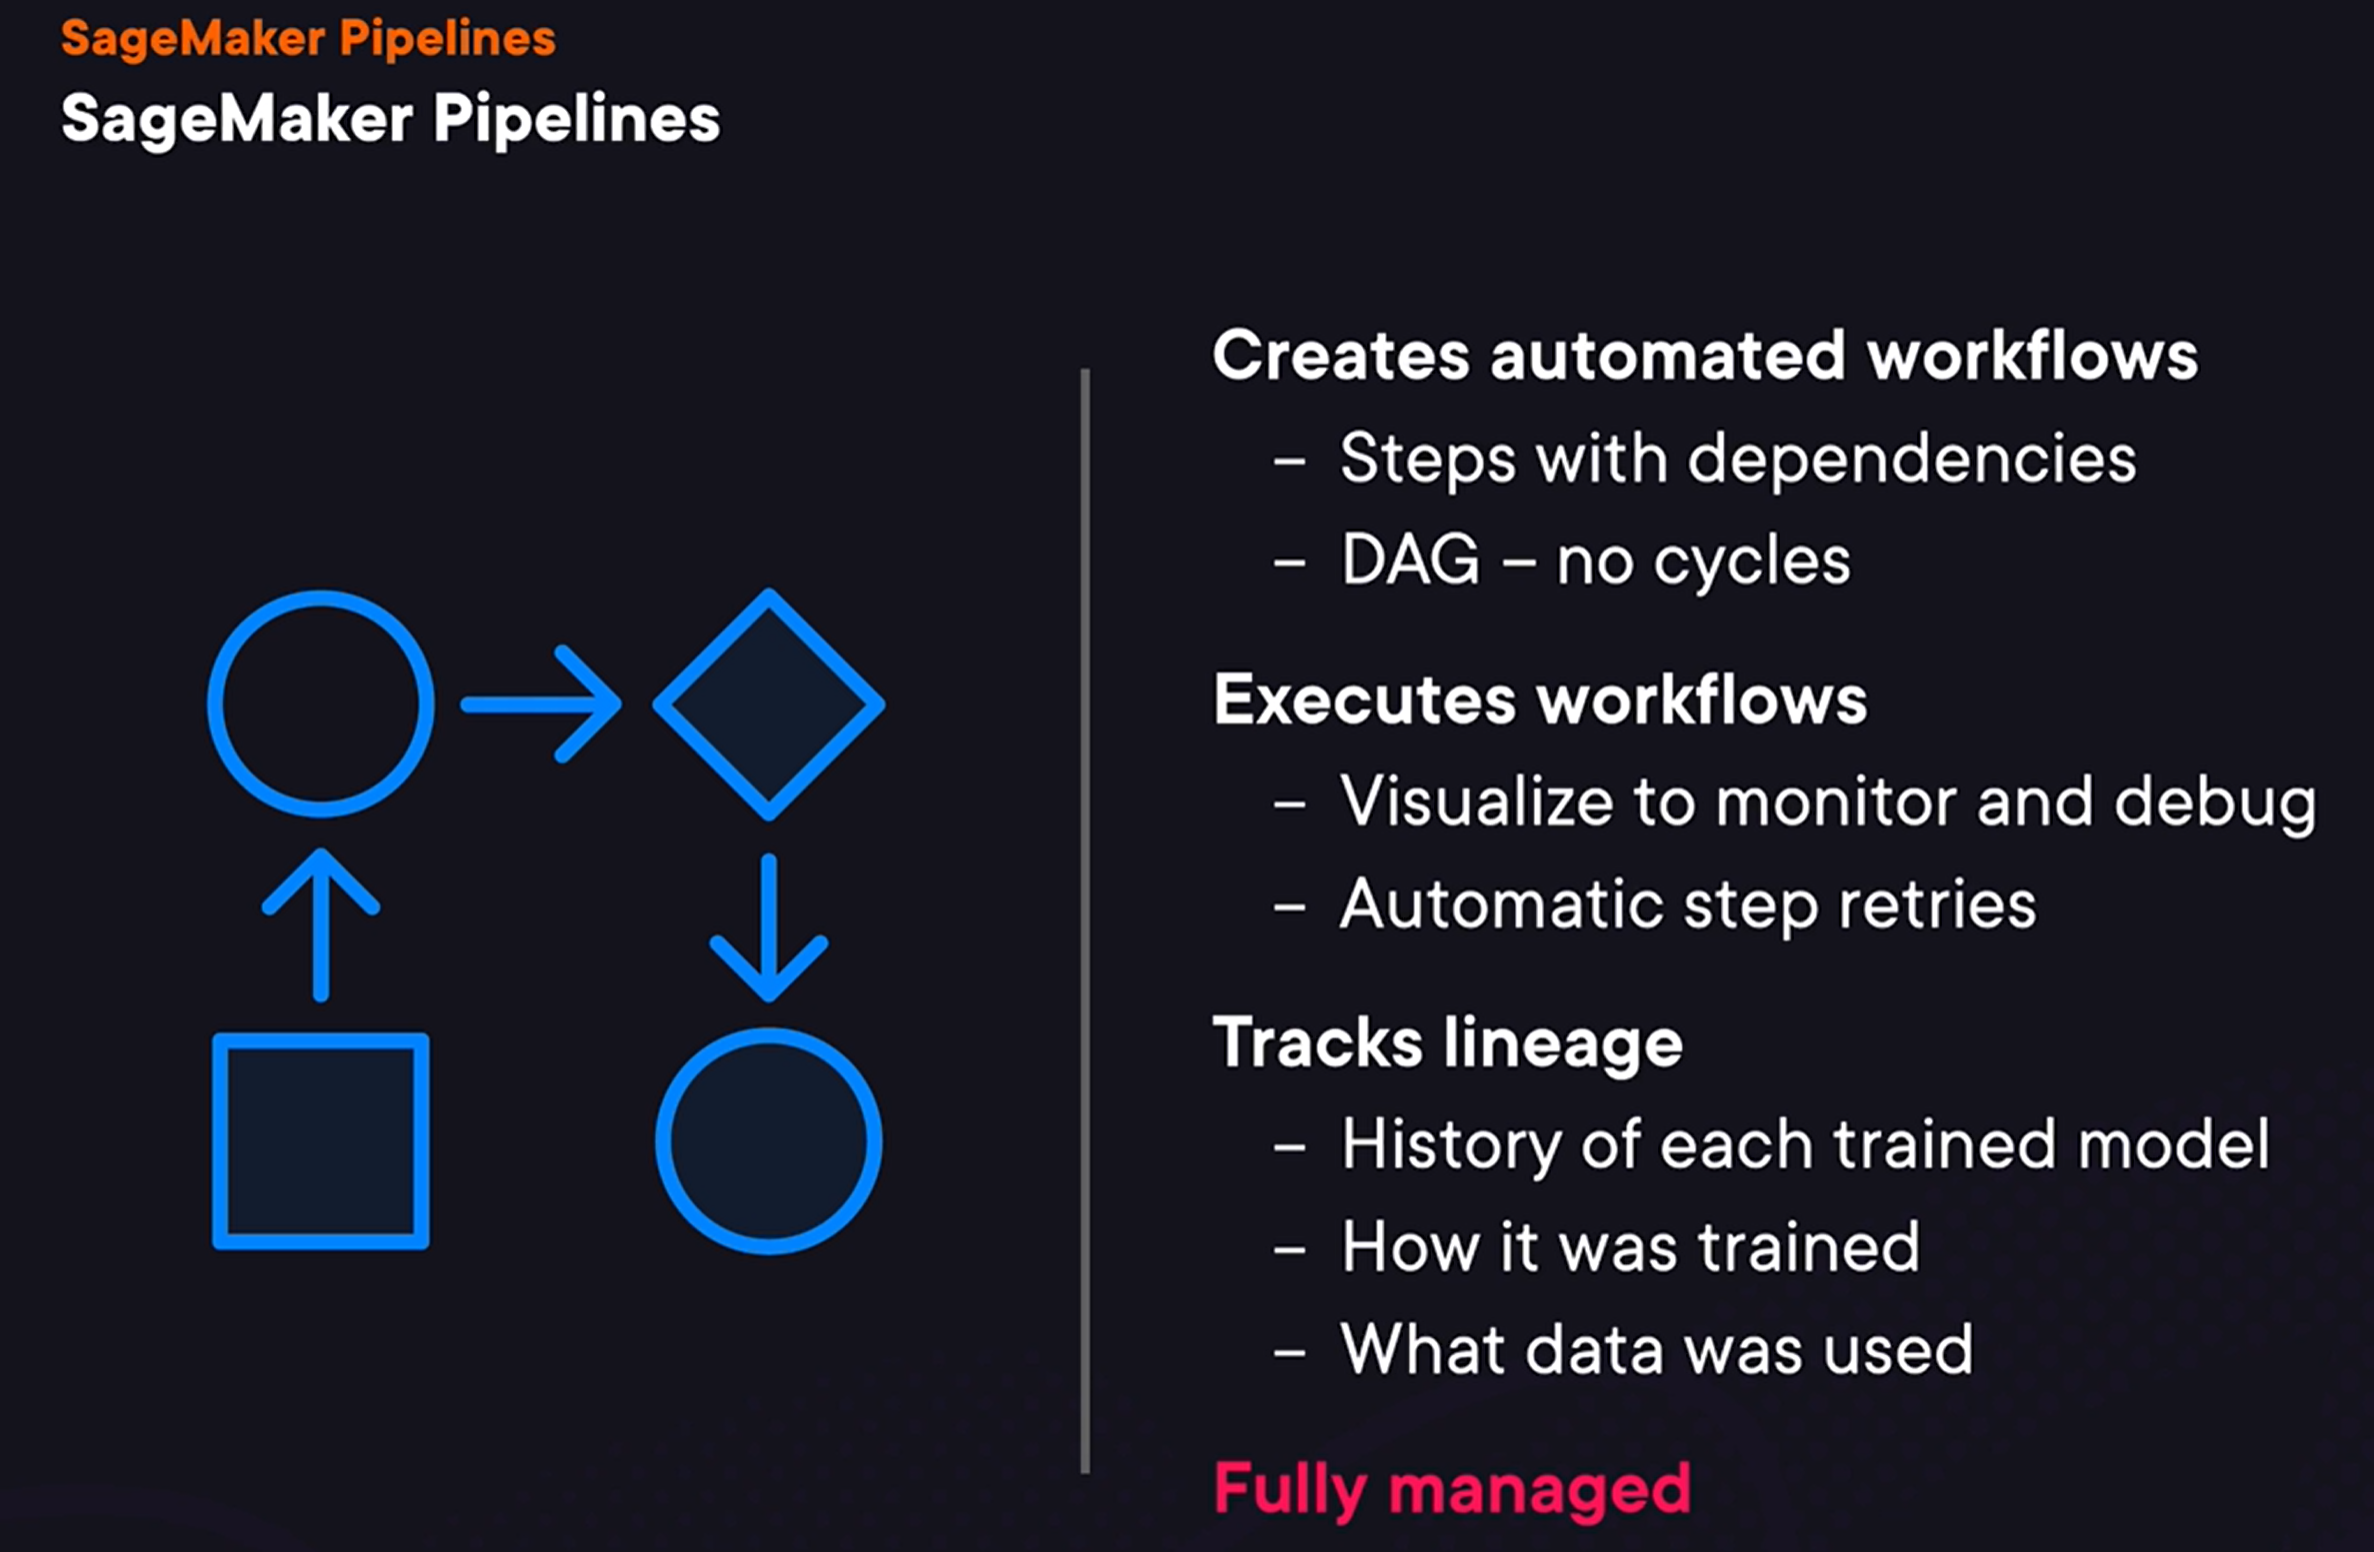
- SageMaker starts executing Pipeline
with steps that have no dependencies. And in this particular case, it starts executing the processing step that performs data processing. After this step is finished, it will start executing steps that depends on this step. And then it will keep doing this until either all steps are executed or until execution fails.
SageMaker has a number of step types we can use to construct our pipeline.
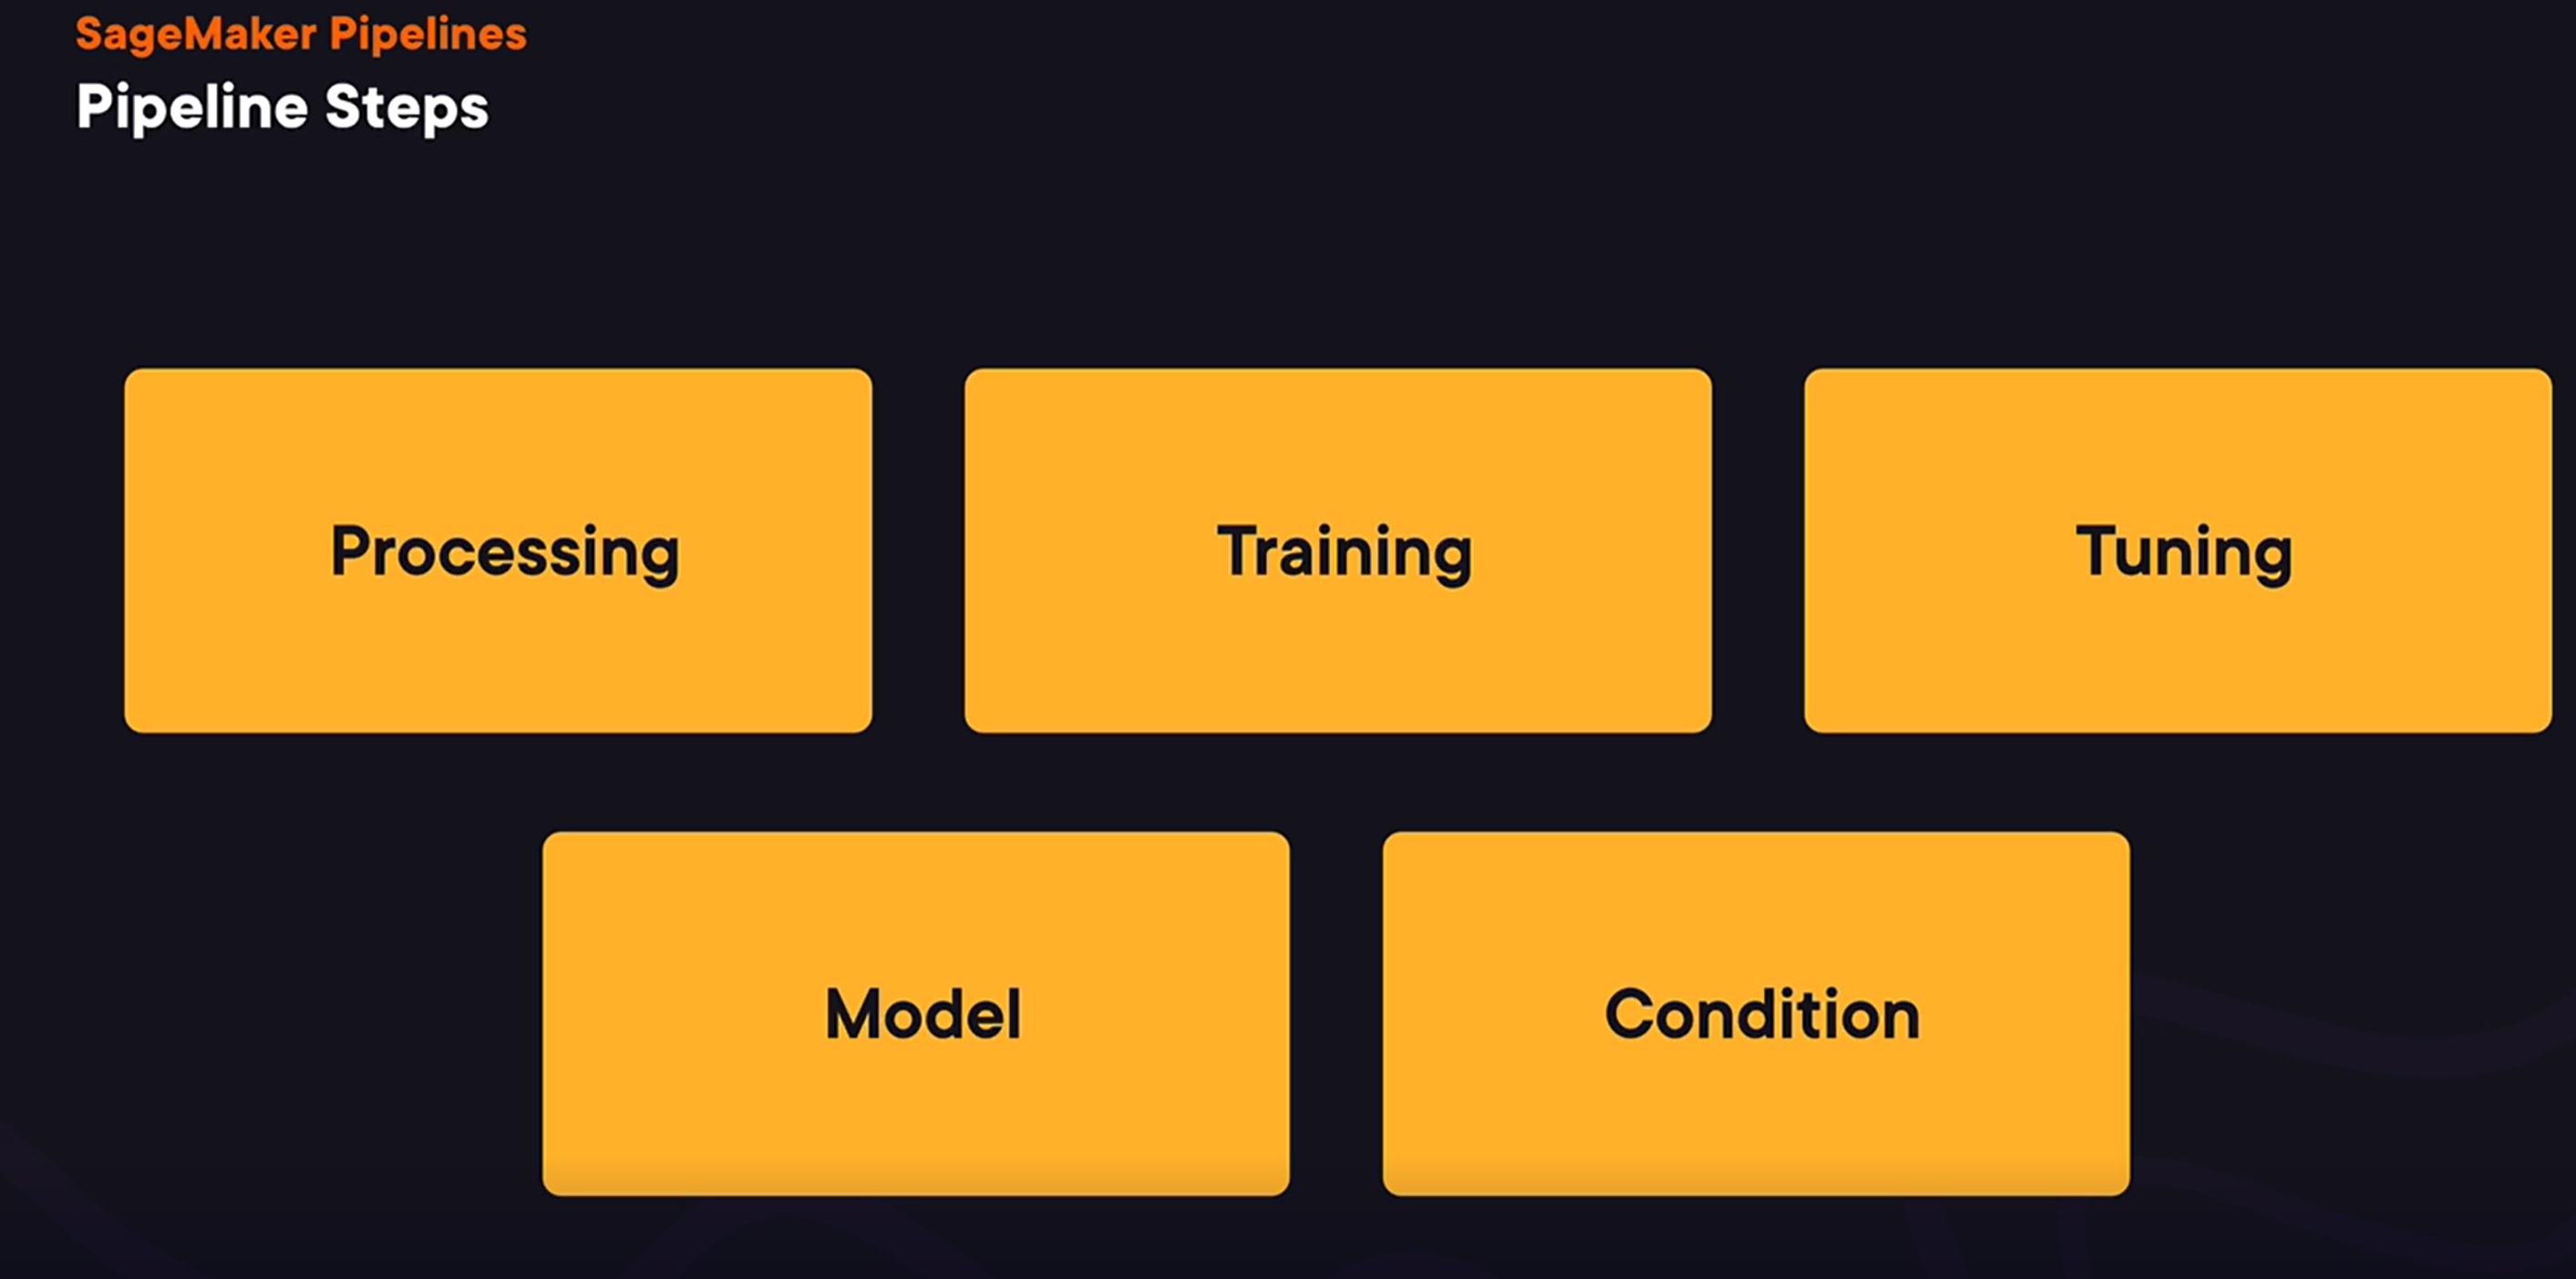
- The processing step allows us to implement data processing
to transform datasets. The training step allows us to train machine learning models. And the tuning step allows us to run a hyperparameter optimization process. And we will talk more about how it can be used later in this course. Model step allows us to register a trained model. And condition step is for conditional statements to decide what set of steps to execute. Let’s now talk about the dependencies between steps.
Pipeline Step Dependencies:
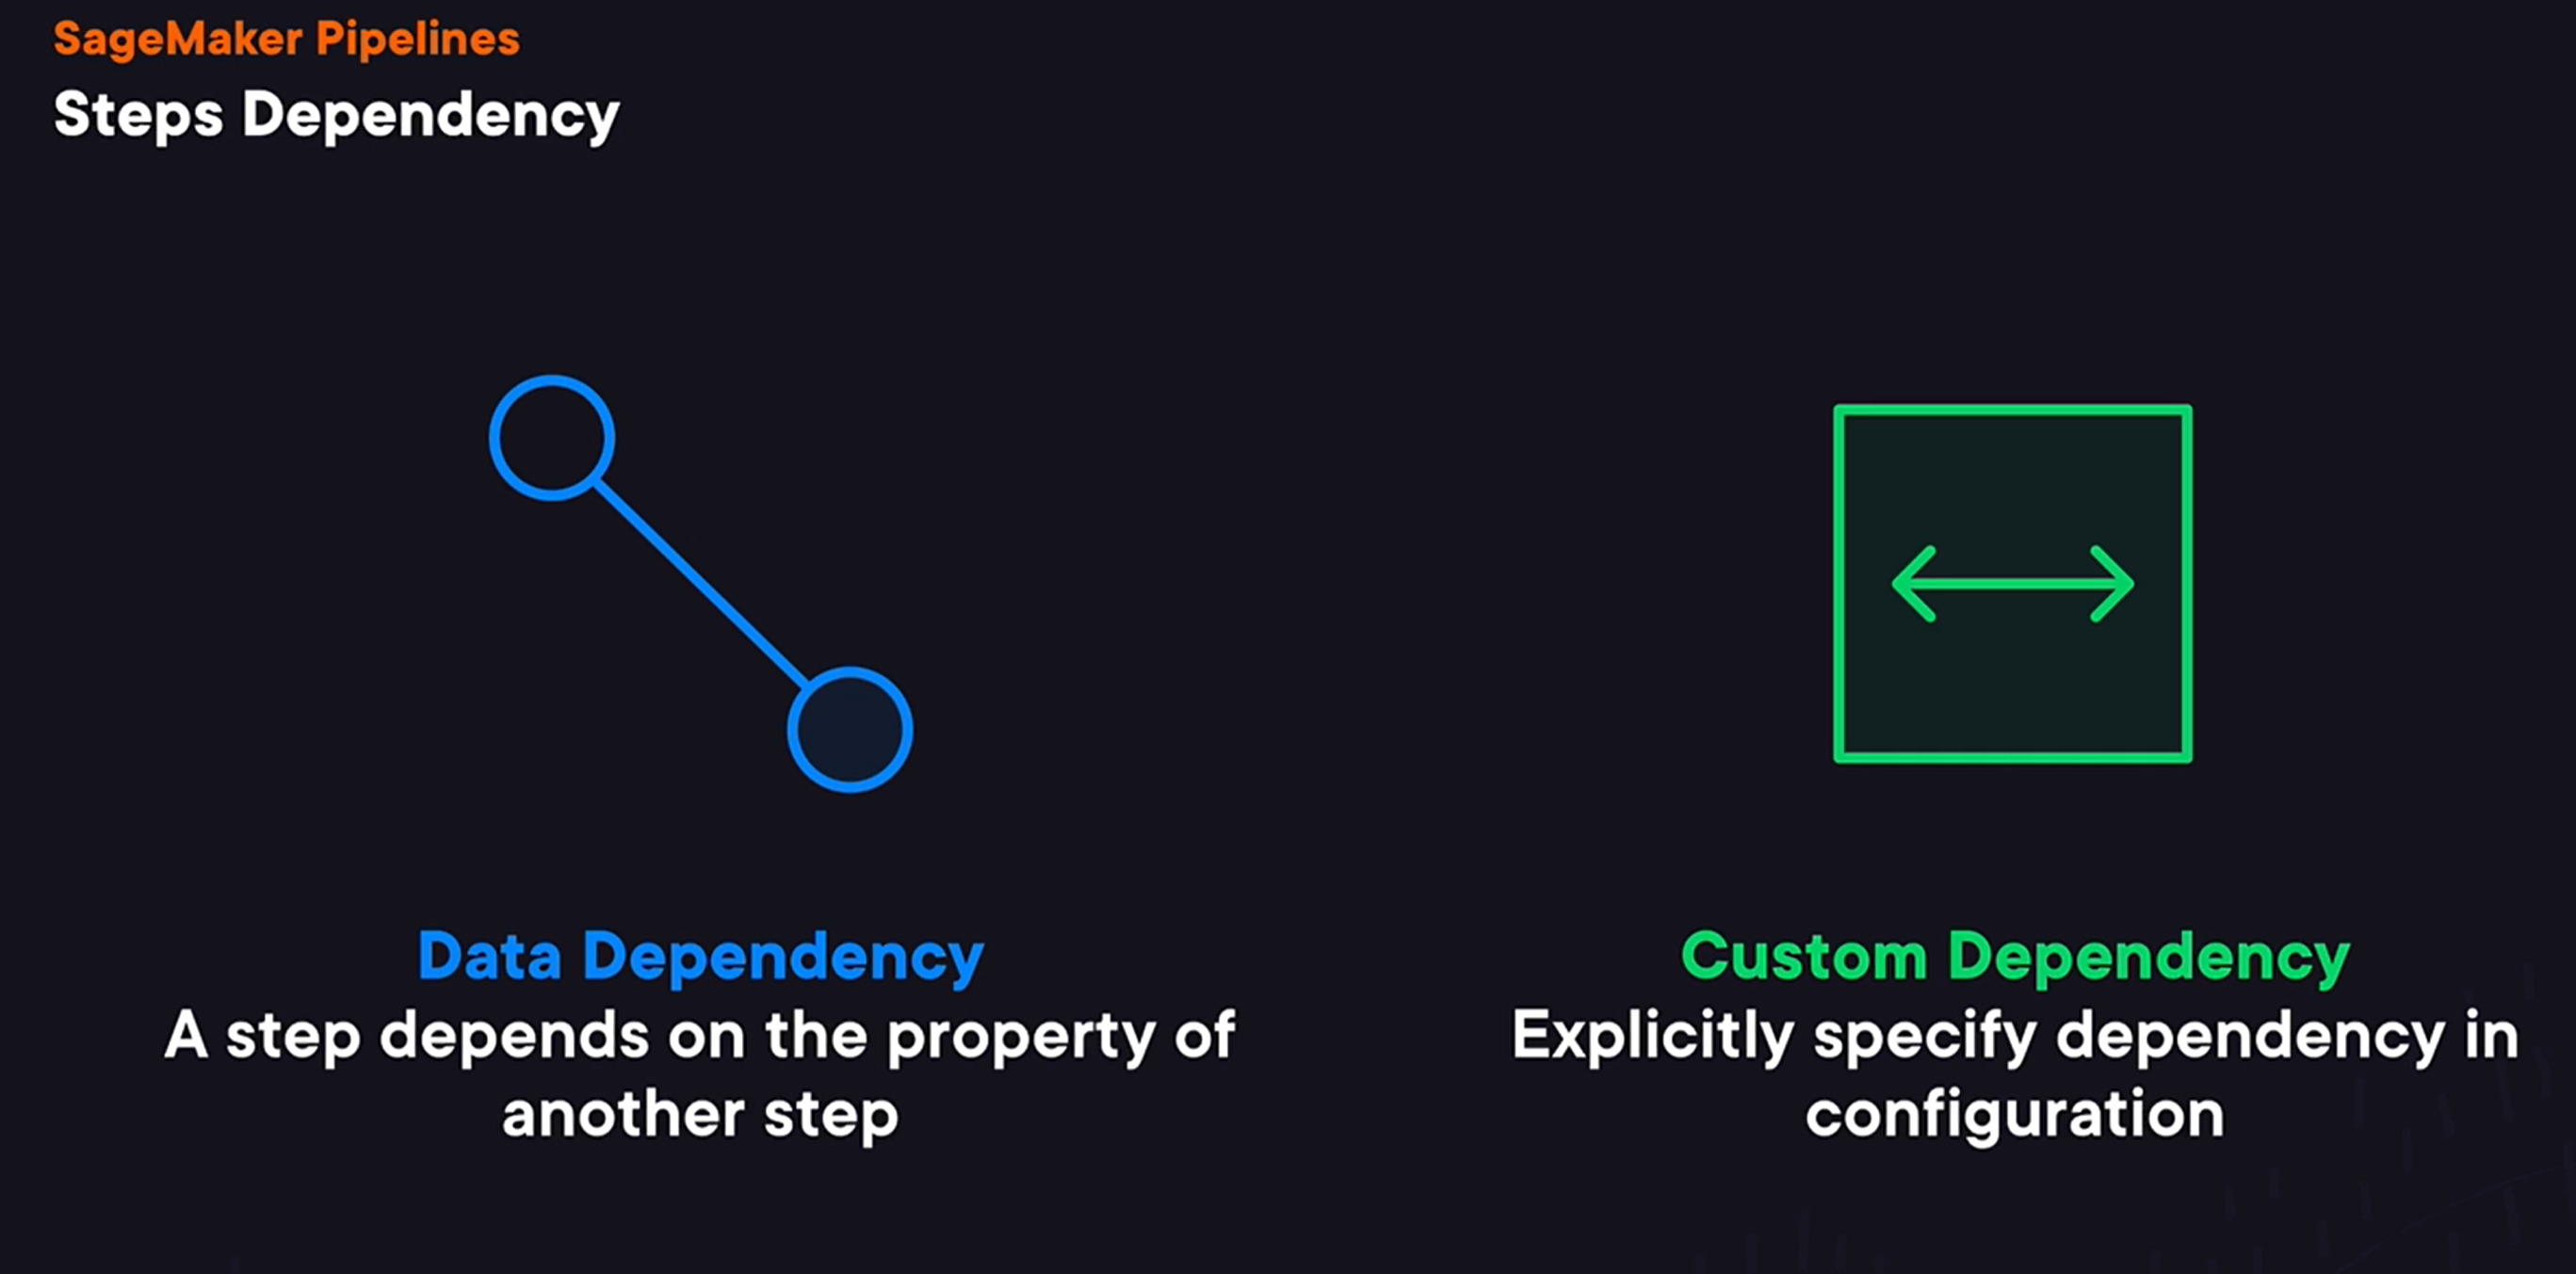
To define dependencies between steps, we have two options. First, we can use data dependency. And in this case, one step depends on the property of another step. For example, a step that registers a model depends on the location of a model trained by the trained step. Or alternatively, we can define a custom dependency when we explicitly specify step dependencies, which is useful for the case when one step uses data produced by another step without explicitly using SageMaker. Now that we’ve covered just enough of theory, we can look at our first pipeline.
Steps to create pipeline
Step 1:
- Define the pipeline by creating an instance of pipeline session
- It is similar to SageMaker session and provides methods for accessing resources that SageMaker uses.
from sagemaker.workflow.pipeline_context import PipelineSession
from sagemaker.workflow.steps import TrainingStep, ModelStep
pipeline_session = PipelineSession()
Step 2: Define each step of the pipeline. First Step is the trainingstep
- Two things in this step
First, we need to define an estimator and we can configure it in the same way we’ve configured it previously. The only difference here is that we use the pipeline session instead of regular SageMaker session. We then can define a training step and we need to provide two parameters. Name, which is an arbitrary string, and you will see that in SageMaker Pipelines each step should have a name. And then we need to provide step arguments and to do this we need to call the fit method on the estimator object. A thing to note here is that it won’t run the training process right away as we saw before when we were training a model without pipelines. Instead, in the context of the pipeline definition, it will only record parameters with which SageMaker Pipeline will train a model when a pipeline is executed.
Second Step is the modelStep
first need to define a model to register. And two most important parameters here are a model image to use and data of the trained model. Notice that here we access the property of the training step and specifically we use the path in S3 where the training step will put trained model data. SageMaker will see this dependency between the model and the training step, and this is how it will know that to register a model, it will first need to wait until the training step is over. And then we need to define the model step itself, which will register a model during the Pipeline execution. And here we need to provide two parameters, the name of the step and arguments for the step. Similarly, to have it defined as a training step, here we call the model register method and pass the result to the step args. And just as with the training step, it won’t try to register a model when we call this method. Instead, it will register a model only when the pipeline is running.
**Third step is pipeline definition and start the pipeline
Now, we’re almost done with defining our pipeline, and once we have these two steps, we can finish our pipeline’s definition by defining the Pipeline instance. Just as with many other things, in the land of SageMaker Pipelines, it has a name. But most importantly, we also need to provide a list of all steps our pipeline is built from. The definition that we have so far doesn’t affect any AWS resources. We only have pipeline definition in memory at this stage. To create the pipeline that our users, say data scientists or machine learning engineers can use, we need to actually create it. And to do this, we can use one of two methods. Pipeline create, creates a pipeline if it doesn’t exist. To create a Pipeline, we need to pass an AWS role. And we also can provide additional configuration, such as parallelism config that specifies how many steps can be executed in parallel. Another way to create a Pipeline is to use the upsert method that creates a pipeline if it doesn’t exist, or updates an existing one. Notice that having a pipeline created doesn’t execute it right away. To run a pipeline, and in our case to train and register a model, we need to call the pipeline start method. When we start a pipeline, we can also provide a name and a description of this execution, which you will see in the SageMaker UI. Talking about a pipeline execution, let’s talk a bit more about how we can start a pipeline. One option is to use SageMaker SDK, and we’ve already seen how we can do this using the start method. We can either do it from a notebook from SageMaker Studio, or we can do it automatically, say when we have new data on which we want to train our model. Or alternatively, we can start our pipeline manually using SageMaker UI. Before we wrap up this lesson, I want to mention one more important thing. First, while SageMaker provides a limited set of steps to build machine learning models, we can always implement custom logic that should be executed during a pipeline execution. To do this, we can use one of two-step types. Lambda step allows to call a Lambda function, and SageMaker Pipelines will wait for a response from this Lambda function. Or we can use callbacks step that sends a message to a specified queue in SQS or simple queue service, and then waits for a callback from custom code when its operation succeeds or fails.
Pipeline Parameters
- Configuration Variables
- Can be used to rerun the pipelines without changing it
- Specify parameters per run
- Each parameter has a default value
- Configuration can be loaded to the pipeline by keeping it in a config file
Defining Parameters
-
ParameterInteger
-
ParameterString
-
ParameterFloat,
-
ParameterBoolean
-
These are imported from sagemaker.workflow.parameters
-
Create an instance of one of the parameter type
input_dataset_path = ParameterString(
  name = "InputDatasetPath",
  default_value = "s3://my-data/dataset.csv"
  )
s3_input_train = TrainingInput(
  s3_data = input_dataset_path
  content_type = "csv"
  )
- All parameters should be listed when creating the pipeline
pipeline = Pipeline(
    name = "Pipeline Example",
    parameters = [input_dataset_path],
    step = [step-train]
- How to specify parameter values during execution?
- Option 1: When pipeline start() is called
  pipeline.start(
      parameters = {
	  'input_dataset_path: "s3://my-data/dataset.csv"

	  }

)
- Option 2: Provide parameter values in the UI
Limitations of parameters
- not all arguments can be parameterized.
For example, when we are defining a custom machine learning training script to run, we cannot specify an entry point using a parameter and we’ll discuss what is training script later in one of the later videos.
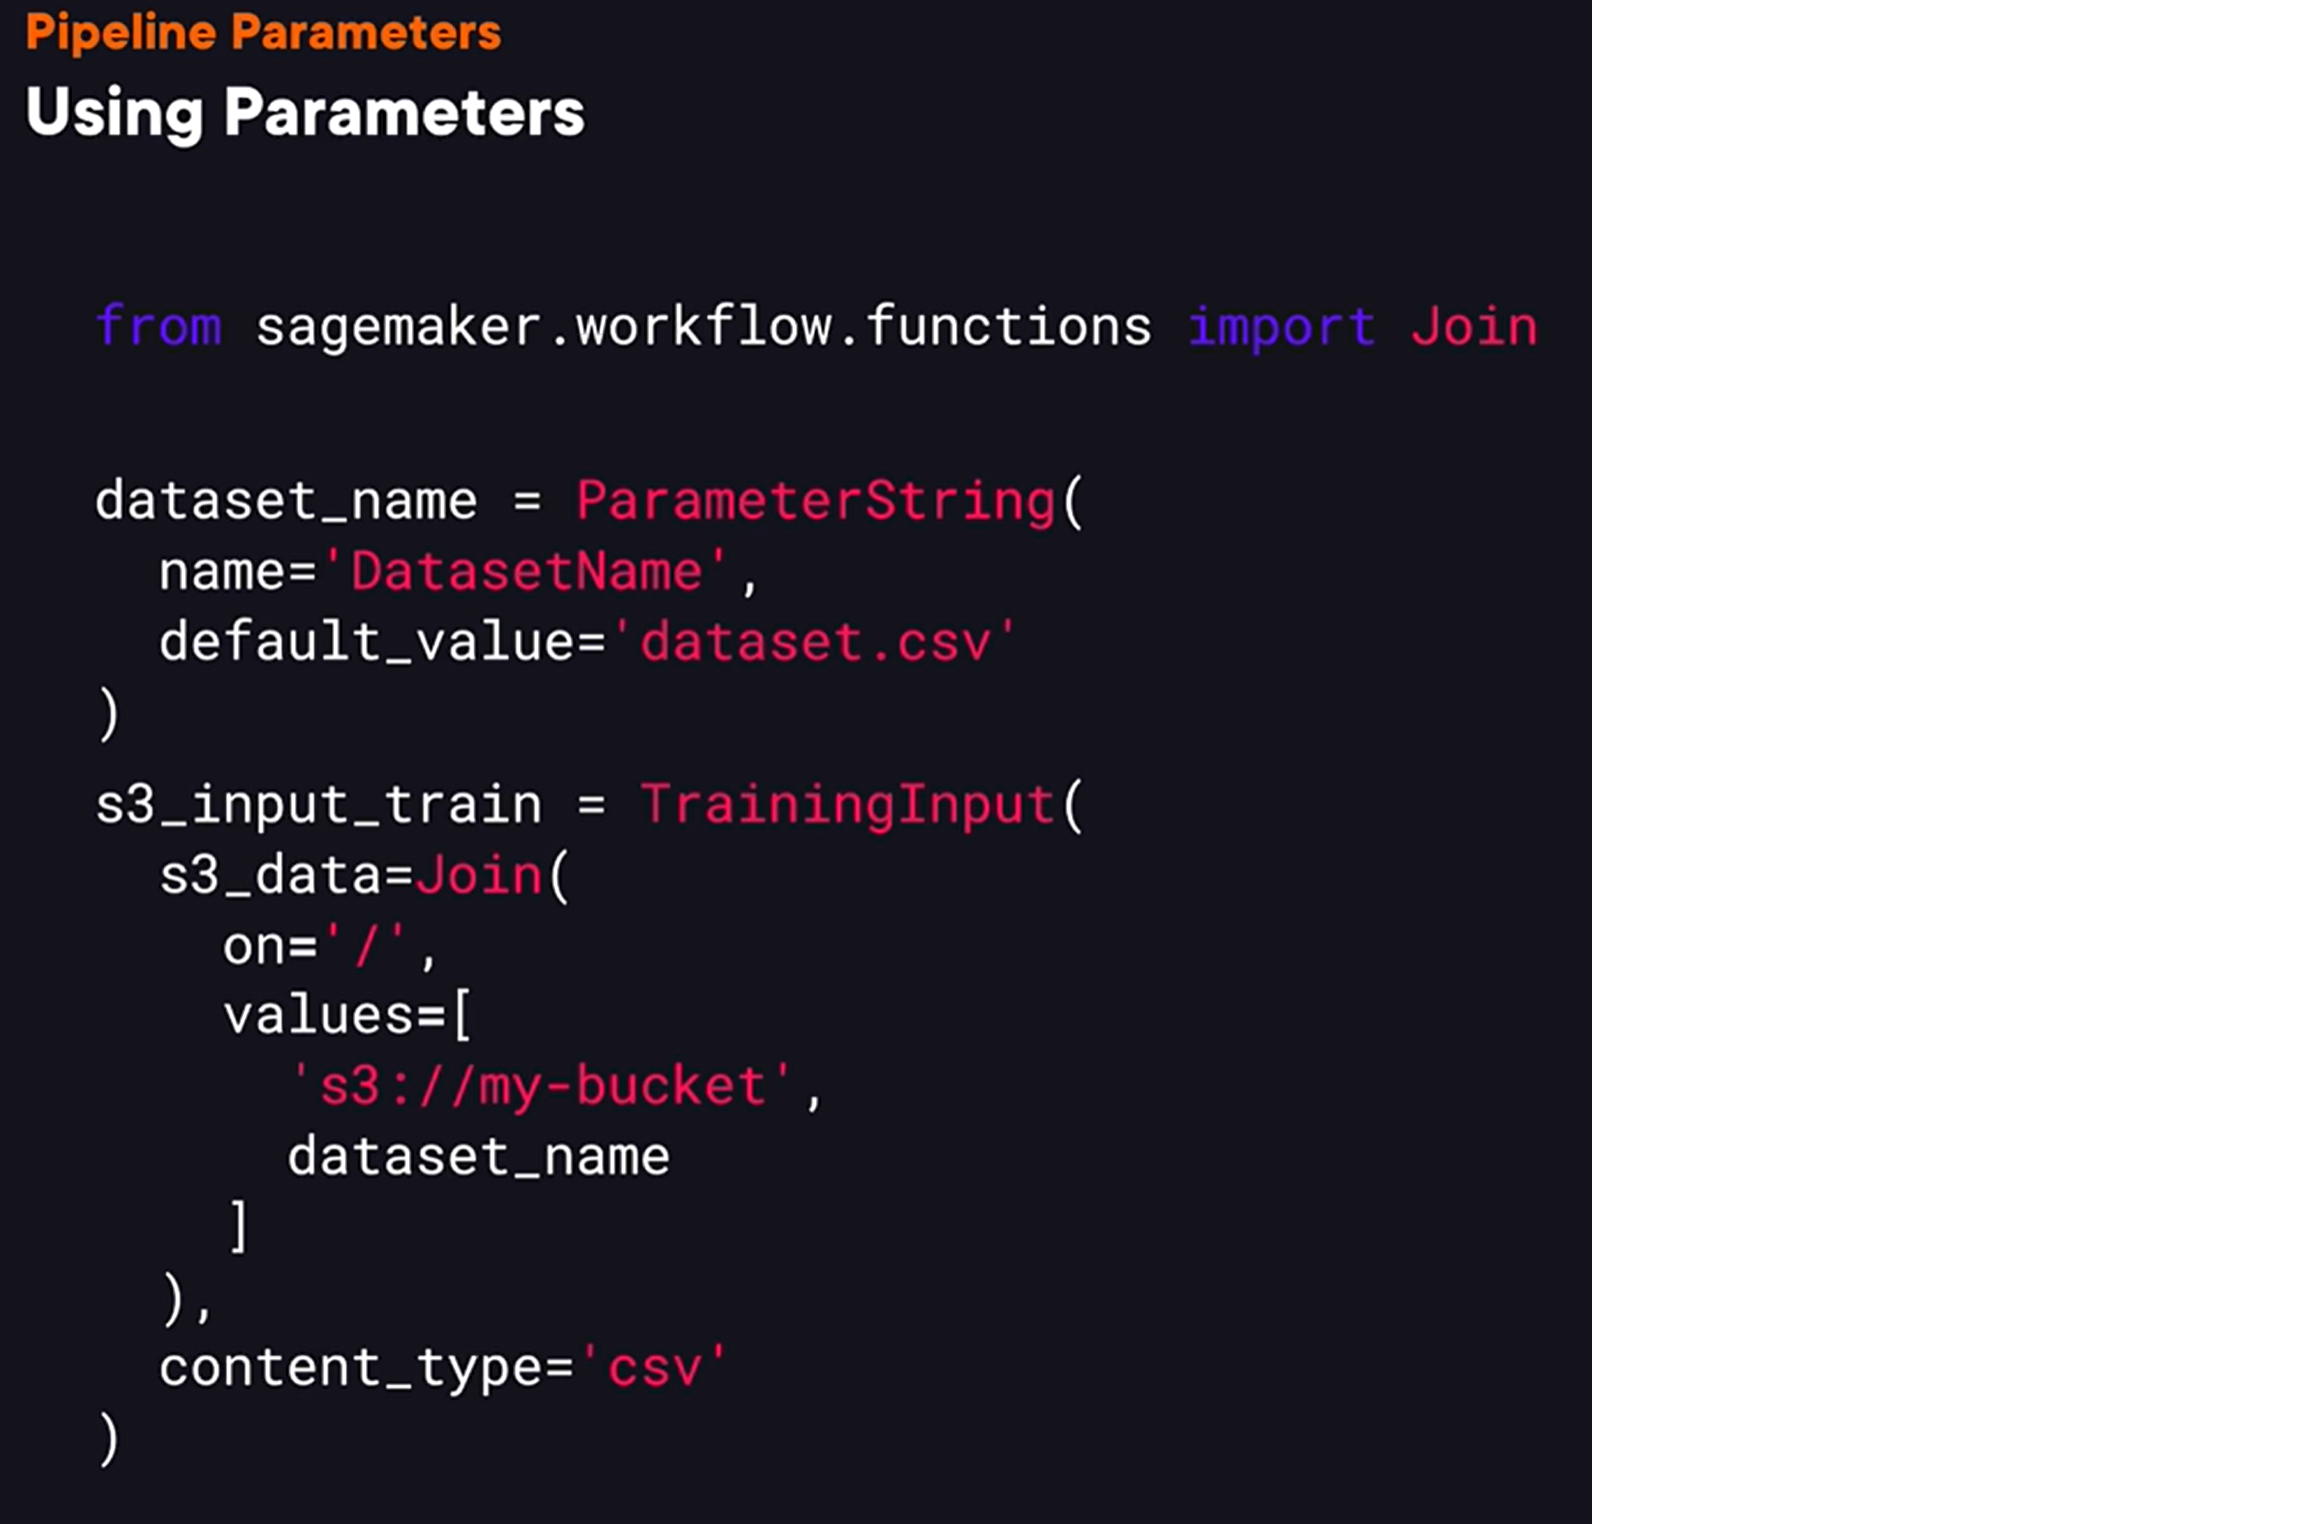
- so, we can’t use built-in Python operators
when working with parameters. For example, we can’t perform string concatenation. So let me give you an example. Let’s say we have a parameter that specifies a name of a dataset in S3, and let’s say we want to use it to get a dataset pass in S3 by concatenate in it with the name of the bucket. So we could try to use Python’s + operator to concatenate to strings, but it won’t work. Instead, we would need to use the joint function from the workflow functions package. To use it, we need to provide values to join into a single string as well as a string that will be inserted between the provided string values.